

Why would a cutting-edge satellite system like Starlink arrive without a standard RJ45 port for your wired devices? If you've tried to get a signal through a double-brick home or a steel-clad shed in a challenging Australian environment, you've likely realised that the standard router's Wi-Fi range has significant physical limitations, making the starlink ethernet adapter a critical piece of hardware for your installation. We understand that for many professional and remote users, a wireless-only setup is more than just a minor inconvenience; it's a technical barrier that prevents the use of VPNs, VLANs, and high-performance third-party hardware.
This guide provides the technical clarity you need to successfully integrate this adapter into your local network. We'll examine the physical specifications of the proprietary SPX connectors, the precise configuration steps for enabling bypass mode on your own router, and the specific hardware differences between the A$60 Gen 2 adapter and newer Gen 3 requirements. By the end of this article, you'll have a clear, step-by-step roadmap for establishing a stable, high-speed wired backbone that meets the unique demands of the Australian environment.
Key Takeaways
- Understand the hardware evolution of the Gen 2 system and why a proprietary bridge is necessary to establish a reliable wired connection.
- Review the technical specifications of the starlink ethernet adapter, including its Gigabit throughput capacity and the physical dimensions required for site planning.
- Learn how to correctly configure Bypass Mode to prevent Double NAT conflicts when integrating professional-grade third-party routers or VPNs.
- Gain practical insights into physical installation techniques, focusing on cable protection and strain relief to withstand the harsh Australian climate.
- Discover how a wired backbone serves as the essential first step for expanding your network via MIMO antennas or long-range wireless bridges.
Understanding the Starlink Ethernet Adapter and Network Limitations
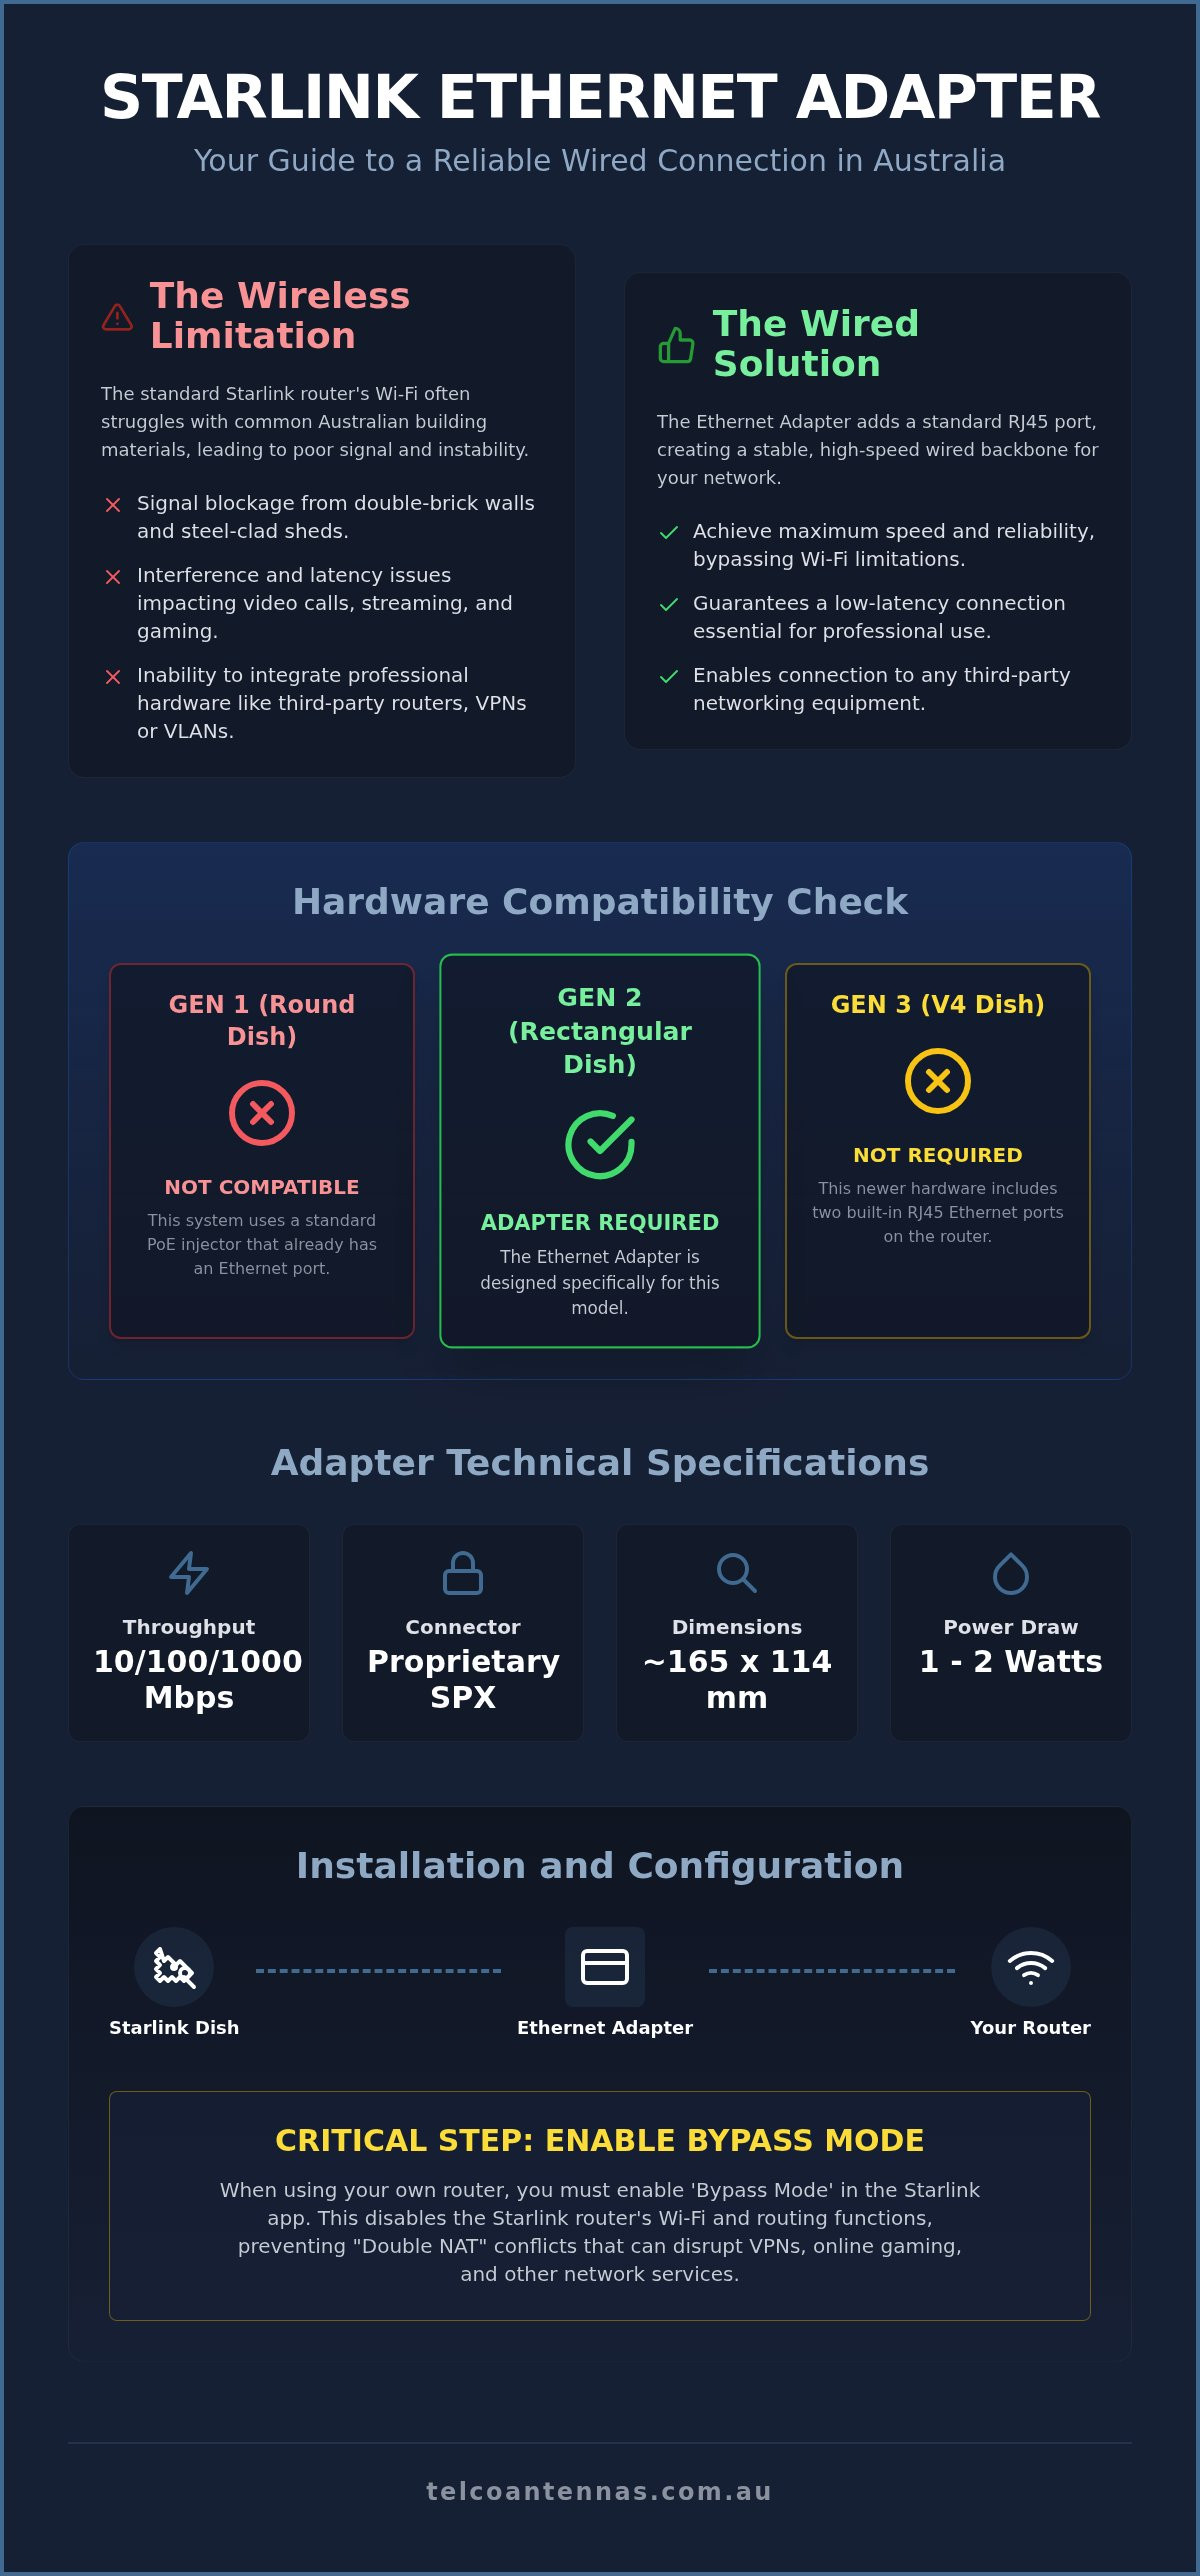
The Gen 2 Starlink kit, often referred to as the "Standard Actuated" model, represented a significant shift in hardware philosophy. Unlike the original circular Dishy, which utilised a standard Power over Ethernet (PoE) injector with an RJ45 port, the Gen 2 router eliminated physical connectivity in favour of an all-wireless approach. This design choice necessitated the introduction of the starlink ethernet adapter, a proprietary bridge that allows users to re-establish a physical link to their local network. For many users in the Starlink satellite constellation network, this adapter is the only way to bypass the basic functionality of the stock router.
The Proprietary SPX Connector vs. Standard RJ45
The most striking feature of the Gen 2 hardware is the SPX connector. While it might resemble a standard USB-C or micro-USB plug at a distance, it's a proprietary, ruggedised interface designed specifically for the dish's unique power and data requirements. This connector is engineered to handle both high-speed data transmission and the substantial DC power draw needed to operate the dish's internal heating elements and phased-array motors.
Because the adapter sits between the dish and the router, it must maintain a waterproof seal. The SPX connector features a deep-seated gasket that prevents moisture ingress, which is vital for Australian installations where equipment is often exposed to extreme humidity or tropical rain. The starlink ethernet adapter functions as a technical "pass-through" for PoE, ensuring the dish receives the necessary voltage while tapping into the data stream to provide a standard RJ45 port for your internal devices.
When Is the Standard Wi-Fi Not Enough?
Relying solely on the Starlink router's internal Wi-Fi often leads to performance bottlenecks, particularly in the Australian residential landscape. Many Australian homes are constructed with double-brick walls or feature metal-clad roofing and sheds. These materials cause significant signal attenuation, effectively blocking 5GHz frequencies and forcing devices onto the slower, more congested 2.4GHz band. If your office is located in a separate wing or a detached shed, the standard Wi-Fi signal simply won't penetrate the structure effectively.
For professional users and gamers, the issue isn't just speed; it's stability. Wireless signals are prone to interference from other appliances and neighbouring networks in high-density urban areas. A physical copper connection eliminates these variables. It provides a stable, low-latency path that's essential for 4K streaming, large-scale backups, and high-stakes remote work where a dropped packet can disrupt a critical video conference. Moving to a wired backbone allows you to bypass the inherent limitations of the standard router's radio environment.
Technical Specifications and Hardware Compatibility
The starlink ethernet adapter is an active interface designed to facilitate 10/100/1000 Mbps throughput between the proprietary Dishy cable and a local area network. It's a compact unit, measuring roughly 165mm by 114mm, with a permanent 1-metre cable that integrates into the existing signal path. For those operating in off-grid environments, it's vital to account for the electrical overhead; while the adapter's power draw is minimal, typically between 1 and 2 watts, this cumulative consumption must be factored into solar and battery calculations. Understanding these physical and electrical constraints ensures the hardware operates within the thermal and power limits of your specific installation site.
Compatibility Matrix: Gen 2 vs. Gen 3 (V4)
A frequent point of confusion for Australian users is identifying which hardware generation actually requires an external port. The starlink ethernet adapter is engineered exclusively for the Gen 2 "Standard Actuated" rectangular dish. If you've upgraded to the newer Gen 3 (V4) hardware, you'll find two standard RJ45 ports already integrated into the rear of the router, making this specific adapter redundant. Conversely, owners of the original Gen 1 "Round" dish cannot use this adapter because that system relies on a standard PoE injector with an existing Ethernet output. Before purchasing, confirm your dish is the rectangular model with the detachable cable. Compliance with Australian satellite regulations requires using approved hardware configurations to ensure signal integrity and safety.
Throughput and Performance Metrics
Transitioning from a wireless link to a hardwired connection via the adapter significantly reduces the "jitter" often experienced during high-bandwidth activities. While the satellite link itself remains the primary speed governor, the adapter removes the Wi-Fi overhead and local interference factors that can throttle performance. It handles the proprietary protocol translation with negligible latency, typically adding less than 1ms to the internal hop. To maintain these Gigabit speeds, it's essential to use high-quality Cat6 or Cat6a cabling from the adapter to your switch. If you're extending the network to a distant building via a wireless bridge, ensure you use premium components and specialist networking hardware to maintain signal integrity across the entire site.
- Interface: Proprietary SPX to RJ45 (Female)
- Speed: Up to 1 Gbps (Full Duplex)
- Cable Length: 1 metre (Fixed)
- Environmental Rating: Indoor use only (Router-side connection)
Advanced Network Topology: Bypass Mode and Third-Party Routers
For professional network administrators and rural property owners, the starlink ethernet adapter serves as the essential bridge to a custom network topology. Its primary function in advanced setups is to facilitate "Bypass Mode". This configuration disables the Starlink router's DHCP server and Wi-Fi radios, effectively converting the unit into a PoE injector for the dish. By doing so, you eliminate the technical hurdle of "Double NAT". Double NAT occurs when two routers perform address translation in sequence, which frequently causes packet loss, breaks VPN stability, and prevents successful port forwarding for remote access or gaming. It's a common issue that often goes undiagnosed until users attempt to host a local server or connect to a corporate office network.
As noted in PCMag's latest Starlink hardware review, the transition to integrated ports in newer generations highlights the demand for wired stability, but Gen 2 users must rely on this adapter to interface with high-performance hardware from brands like Ubiquiti or Mikrotik. These routers offer superior firewall controls and VLAN management that the basic Starlink app cannot provide.
Configuring Bypass Mode via the Starlink App
Enabling this mode is a deliberate process within the Starlink app. Navigate to the "Settings" menu, select "Advanced", and toggle "Bypass Mode". Once confirmed, the Starlink router's Wi-Fi signal will cease, and the unit will only pass traffic through the starlink ethernet adapter to your connected hardware. If you lose connectivity or need to revert, a factory reset is required. For most Gen 2 models, this involves unplugging and replugging the power cable six times in quick succession. After the reset, verify your third-party router's WAN interface is receiving a public or CGNAT IP address from the dish to ensure the handshake is complete. It's a straightforward procedure, but requires attention to detail to ensure the external router takes over all traffic management duties.
Integrating with Professional RF Infrastructure
The adapter is often the starting point for more complex Australian site deployments. In rural settings, it acts as the data source for Point-to-Point (PtP) wireless bridges. These bridges allow you to beam the internet signal from a main farmhouse to detached sheds or shearing quarters several kilometres away without digging trenches for fibre. This is a pragmatic solution for large properties where Wi-Fi penetration is physically impossible due to distance or building materials.
Additionally, the adapter allows for the integration of Starlink into a multi-WAN environment. This is particularly useful for commercial sites that require high availability. By connecting the adapter to a load-balancing switch, you can configure a failover system that automatically switches to a 4G or 5G mobile signal booster if the satellite link is obstructed or experiences heavy rain fade. This hybrid approach ensures that critical communication remains online regardless of atmospheric conditions or satellite position.
Installation and Troubleshooting in the Australian Environment
Physical installation of the starlink ethernet adapter is a straightforward process, but the longevity of the connection depends on how well you protect the hardware from Australia's environmental extremes. The adapter is designed to sit between the Starlink router and the dish cable. To install it, you must first power down the system, disconnect the dish cable from the base of the router, and insert the adapter's proprietary SPX plug into the router. The dish cable then seats into the adapter's input port. It's vital to ensure these connectors are fully seated; a loose connection can lead to electrical arcing, which may permanently damage the pins or cause intermittent signal drops.
Physical Setup and Cable Routing
In high-wind areas or coastal regions, cable management is non-negotiable. Use UV-stabilised cable ties to secure the adapter and its leads to the router stand or a mounting bracket. This prevents the weight of the cable from putting constant strain on the SPX ports. We strongly recommend implementing a "drip loop" where the cable enters the building or connects to the adapter. This simple U-shaped bend in the cable ensures that rainwater runs off the lowest point of the loop rather than tracking along the jacket and into the sensitive electronics. In regional sheds or workshops, the RJ45 port is particularly vulnerable to dust and nesting insects; using a port plug or housing the adapter in a ventilated, dust-proof enclosure can prevent physical obstructions from breaking the link.
Heat management is another critical factor. Australian roof cavities often exceed 60°C during summer, which is well above the safe operating temperature for most networking gear. If you're installing the router and adapter in a ceiling space, ensure it's in a well-ventilated area rather than an uninsulated corner. Excessive heat can cause the adapter to throttle throughput or report a hardware failure in the Starlink app.
Solving Common Connectivity Issues
The most frequent error users encounter is the "Ethernet Disconnected" status within the app. If this occurs, first check that the adapter's proprietary plug is pushed firmly into the router base. You should feel a distinct click. If the adapter still isn't recognised, power cycle the entire system by unplugging the main AC lead for 30 seconds. To determine if the fault lies with the adapter or your downstream equipment, connect a laptop directly to the adapter's RJ45 port using a known-working Cat6 cable. If the laptop receives an IP address but your third-party router doesn't, the issue is likely a configuration error in your router's WAN settings. For those building a more robust network, investing in high-quality cabling and signal boosters can help bridge the gap when Starlink alone isn't enough.
Future-Proofing Your Remote Connectivity
The starlink ethernet adapter serves as the foundational component for any Australian remote site that requires more than basic residential connectivity. If your usage is limited to a small cabin with no internal obstructions, the standard Wi-Fi might be sufficient for your needs. However, for those managing double-brick homes, industrial sheds, or remote offices, the investment in a wired backbone is mandatory to ensure network stability. By removing the dependency on a single wireless access point, you gain the ability to distribute high-speed internet across entire properties, ensuring that every structure remains connected regardless of its building materials.
As the satellite landscape evolves, many Gen 2 owners are questioning the longevity of their hardware following the Gen 3 release. It's important to understand that while the Gen 3 router includes integrated ports, the Gen 2 system remains a robust and highly capable solution when paired with a starlink ethernet adapter. For those operating in mobile or off-grid environments, the Gen 2's power profile is often more manageable for existing solar arrays. We provide specialised Starlink after market power conversion solutions, allowing you to run your entire system directly from a 12V or 24V battery bank. This eliminates the inefficiencies of using a large inverter just to power your internet connection.
The Role of Telco Antennas in Your Starlink Deployment
Our expertise extends beyond simple hardware integration. We provide comprehensive RF site surveys and communication tower design to ensure your equipment is positioned for maximum line-of-sight and minimal obstruction. Integrating your Starlink system with Cel-Fi GO mobile signal boosters creates a unified communication hub. This setup provides both high-speed data and reliable cellular voice coverage in areas where neither was previously available. By using high-quality LMR-400 coaxial cables and custom MIMO antennas, we help you overcome the specific environmental challenges of the Australian outback.
The Path to a Truly Connected Remote Site
The decision to install a wired adapter usually marks the transition from a consumer-grade setup to a managed professional network. Once you have a physical Ethernet output, you can deploy point-to-point wireless bridges to eliminate "black spots" on large acreages. This approach allows you to beam your Starlink connection over several kilometres, turning a single satellite dish into a property-wide utility. If you're ready to move beyond basic Wi-Fi and require a tailored connectivity solution, we invite you to enquire about our professional site survey and design services to ensure your infrastructure is built for the long term.
Establishing Professional Network Reliability
Integrating the starlink ethernet adapter is a functional necessity for any Australian installation that requires more than basic wireless coverage. We've detailed how this hardware facilitates bypass mode to eliminate double NAT issues and why physical installation techniques like drip loops are essential to withstand regional environmental stresses. A hardwired connection isn't just about speed; it's the technical foundation required to deploy advanced RF infrastructure like MIMO antennas and point-to-point wireless bridges across large properties.
Building a robust network in remote areas requires hardware that can handle the specific challenges of the outback. At Telco Antennas, we combine specialised Australian RF engineering expertise with a range of robust components designed to maintain connectivity in the harshest conditions. Whether you're configuring an off-grid caravan or a commercial site, you can explore our range of Starlink mounting and power solutions at Telco Antennas with the confidence of national delivery on all accessories. Moving beyond standard Wi-Fi is the first step toward a professional, managed network that delivers consistent performance where you need it most. We're here to help you engineer a system that works as hard as you do.
Frequently Asked Questions
Does the Starlink Ethernet adapter work with the Gen 3 (V4) router?
No, the official starlink ethernet adapter is not compatible with Gen 3 (V4) hardware because that model already includes two integrated RJ45 ports. If you own the newer Standard kit, you don't need additional hardware to establish a wired connection. This specific adapter was designed exclusively for the Gen 2 rectangular dish, which lacked a physical port on the stock router base. Owners of Gen 3 hardware can simply plug standard cables directly into their router.
Can I use a third-party Ethernet adapter with my Starlink Gen 2 kit?
Yes, third-party manufacturers produce compatible adapters for the Australian market, typically priced between A$90 and A$110. While these provide the same functional bridge between SPX and RJ45 standards, you should verify the build quality for Australian conditions. Ensure any third-party unit supports full Gigabit throughput to avoid creating a bottleneck in your local network. Some cheaper alternatives may limit speeds to 100 Mbps, which would throttle your satellite connection's potential.
Will using the Ethernet adapter slow down my Starlink internet speeds?
No, the adapter will not slow down your connection. It actually provides a more stable throughput than Wi-Fi by eliminating local wireless interference. The starlink ethernet adapter supports speeds up to 1000 Mbps, which far exceeds the typical 100 to 200 Mbps download speeds provided by Starlink residential plans in Australia. Using a high-quality Cat6 cable ensures you capture the full performance of the satellite link without the latency spikes associated with wireless signals.
How do I factory reset my Starlink router if I turn on Bypass Mode by mistake?
To reset your router after enabling Bypass Mode, perform a manual power cycle by unplugging and replugging the AC power cord six times in quick succession. There is no physical reset button on the Gen 2 router. Once the sequence is complete, the router will reboot and restore its default Wi-Fi signal. You can then access the settings via the Starlink app to reconfigure your network or attempt the third-party router setup again.
Is the Starlink Ethernet adapter waterproof for outdoor installation?
No, the adapter itself is rated for indoor use only and should be housed inside your building or a weather-proof enclosure. While the proprietary SPX connector that plugs into the router features a water-resistant seal, the RJ45 port and the adapter body are not waterproof. For Australian installations, avoid placing the adapter in areas prone to moisture or high humidity, such as unsealed eaves or damp sub-floors, to prevent corrosion of the copper contacts.
Can I connect a network switch directly to the Starlink Ethernet adapter?
Yes, you can connect a network switch directly to the adapter to distribute internet to multiple wired devices. If you're using the standard Starlink router, the switch will expand the number of available ports. However, if you've enabled Bypass Mode, the adapter must connect first to the WAN port of your third-party router. You can then connect your network switch to the LAN ports of that secondary router to manage your local site traffic effectively.
Do I need the Ethernet adapter if I only want to use a Wi-Fi mesh system?
Yes, the adapter is necessary if your Wi-Fi mesh system requires a physical connection to the primary node. Most high-performance mesh systems available in Australia, such as TP-Link Deco or Netgear Orbi, perform best when the main unit is hardwired to the internet source. Without the adapter, you would be forced to use the mesh nodes in a wireless repeater mode, which often reduces the overall speed and increases latency across your home.
What is the maximum length of Ethernet cable I can run from the adapter?
You can run a standard Ethernet cable up to 100 metres from the adapter to your device or network switch. This follows the standard IEEE 802.3 specifications for Cat6 and Cat6a copper cabling. If your installation requires a longer run, such as connecting a remote shed or gatehouse, we recommend using a point-to-point wireless bridge or a fibre optic link to maintain signal integrity and avoid issues with voltage drop or electromagnetic interference.


