
A low-profile Starlink mount isn’t automatically the better fit for every caravan. The starlink flat high performance 12v conversion kit must suit the dish’s mounting geometry and the vehicle’s DC power system, so choosing by appearance alone can lead to a mismatch.
When comparing a flush installation with a conventional caravan mount, it’s also worth asking whether your 12V supply can run the equipment reliably. The answer depends on the exact Starlink dish and conversion system, not simply on replacing a cable or adding a mount.
This guide compares Flat High Performance and Standard caravan setups, with practical checks for mounting, power and installation. Use the dish model, roof layout, electrical system and travel pattern to narrow down a suitable configuration.
Key Takeaways
- Choose the Starlink dish and power architecture before settling on a mount. A flat mount describes an installation approach, not a separate dish type.
- Use the exact dish model and current manufacturer requirements to assess whether a starlink flat high performance 12v conversion kit is suitable.
- Compare low-profile and conventional mounts by compatibility, installation location, access and conditions such as vibration and obstruction.
- Before installation, assess your caravan battery, charging sources, other electrical loads, cable route and protection requirements.
- Match the dish, mount and power source to your travel pattern and the practical access needed for maintenance.
Starlink High Performance flat mount vs Standard caravan mount: what is being compared?
Choose the Starlink dish and power architecture before settling on a mount. The dish determines which mounting hardware and power-conversion options may be suitable; the mount determines how the dish can be positioned on your caravan. Treating these as one decision can result in an installation that looks neat but doesn’t suit the equipment or vehicle supply.
A flat mount is a low-profile installation approach, not a separate type of Starlink dish. Starlink High Performance and Starlink Standard are distinct hardware families, so their names aren’t interchangeable when assessing fit or power. For background on the network the equipment connects to, see this overview of the Starlink satellite internet constellation.
Keep the four parts distinct:
- Dish: The Starlink hardware model, which sets equipment-specific requirements.
- Mount: The structure or fitting that supports and positions the dish.
- Power conversion: Equipment that adapts a DC supply to the requirements of supported Starlink hardware.
- Vehicle supply: The caravan’s battery and electrical system providing power to the conversion equipment.
Does a flat mount change which Starlink dish you have?
No. Mounting style and dish model are separate decisions. A low-profile mount doesn’t turn a Standard dish into High Performance hardware or make a mount designed for one family suitable for another. Identify the exact model using its label and current Starlink documentation. Then compare its dimensions, required orientation and permitted mounting positions with the mount design and available roof space.
What does a 12V conversion kit do in a caravan setup?
A conversion kit adapts an available DC supply to the electrical requirements of the Starlink equipment it supports. Assess the starlink flat high performance 12v conversion kit as part of the equipment chain, not as a cable swap. Its supported dish models and operating limits must align with the manufacturer’s requirements and the caravan’s electrical system.
A nominal 12V supply describes a system category; verified operating limits describe the voltage range and conditions the equipment can accept. Battery condition, charging activity and other electrical loads can affect the supply, so a caravan battery labelled 12V doesn’t automatically provide suitable input in every operating condition. Check current manufacturer documentation for both the dish and conversion equipment, including input limits, current requirements and protection needs. Resolve mount choice and power compatibility alongside each other, but first identify the exact dish.
How Starlink dish specifications shape a 12V conversion
A suitable conversion depends on the electrical requirements of the exact Starlink dish, not just the fact that a caravan has a 12V battery. Dish models can have different input requirements, so don’t carry figures from one model across to another. Use current manufacturer documentation to choose conversion equipment. A general comparison, such as this overview of Starlink dish specifications, can help you identify what to compare, but it doesn’t replace model-specific requirements.
Which electrical specifications must be checked first?
Record the dish’s specified input-voltage limits and power requirements, then compare them with the conversion equipment’s documented input range and output characteristics. Check protection details against the product documentation. A change from Standard to High Performance, or to another dish family, may change the requirements, so don’t assume the same conversion setup remains suitable.
Keep these electrical terms distinct:
- Voltage is the electrical potential supplied to equipment.
- Current is the flow of electricity required under operating conditions.
- Power describes the rate of energy use at a point in time.
- Energy describes consumption over time, which helps estimate battery use.
Compatibility depends on verified input limits and system load, not on a nominal 12V label alone. For a starlink flat high performance 12v conversion kit, also verify connector type, polarity and cable length against the documentation. These are checks, not assumed kit features. Incorrect polarity or an unsuitable connector can prevent correct operation, while cable length and conductor size can affect voltage at the equipment.
How do battery capacity and cable runs affect operation?
Battery capacity indicates how much energy is stored; it doesn’t, by itself, prove the system can deliver the required voltage and current. Battery chemistry and condition, charging equipment and simultaneous loads all affect the installation assessment. A long cable run can contribute to voltage drop, so calculations should use the actual cable, route and documented load rather than a generic estimate.
Include heat in the assessment. Electrical components and connections need to operate within their specified conditions, particularly where equipment is enclosed or exposed to caravan heat and vibration. Review documented cable and connector limits, routing, ventilation and protection needs as one system. Telco Antennas supplies Starlink aftermarket power conversion to help match conversion equipment to the dish and vehicle supply.
Flat High Performance mount vs Standard caravan mount: compare the trade-offs
A low-profile installation can reduce how far equipment projects above the caravan roof, while a conventional mount may make positioning and access easier in some layouts. Neither approach is automatically better. Compare the exact dish, available mounting surface and how you use the caravan, then assess power separately. A mount doesn’t establish 12V electrical compatibility; that depends on the dish, conversion equipment and vehicle supply.
Use this comparison to identify what to check for your installation. Verify mount fitment and permitted dish positions against the relevant manufacturer documentation rather than relying on a general product description.
| Factor | Flat High Performance approach | Standard caravan mount approach |
|---|---|---|
| Dish compatibility | Check that the mount is designed for the exact High Performance model. | Check fitment for the exact Standard dish model; don’t assume it suits other families. |
| Profile | Low-profile positioning may suit roof-clearance constraints. | Compare the mount’s height and footprint with roof features and travel needs. |
| Installation location | Assess roof space, orientation guidance and cable routing. | Assess the mounting surface, nearby obstructions and intended deployment environment. |
| Access | Plan how the dish, fasteners and cable connections can be inspected or serviced. | Consider whether the installation allows practical access for adjustment and maintenance. |
| Power checks | Verify dish requirements and conversion compatibility independently of the mount. | Apply the same checks to the selected Standard model and its power arrangement. |
Weather exposure, vibration, potential obstruction and maintenance access depend on the installation site. Consider whether roof fittings, branches, accessories or other structures could affect the proposed position, and whether you can inspect the installation after travel. Don’t infer a highway-speed rating, weather-test result or universal fitment from a low-profile design alone.
When might a flat High Performance mounting approach suit a caravan?
It may be worth assessing where roof clearance is limited and the available space accommodates the dish and cable route. Before committing, compare the mount with the dish dimensions and manufacturer mounting and operating guidance, including any permitted orientation. A lower profile is a physical design consideration, not a guarantee of better connectivity or suitability for every roof.
When might a Standard dish caravan mount be the practical choice?
Start with the exact Standard model, then assess its mounting surface, travel pattern and access for inspection. Compare the proposed position with roof obstructions and the conditions in which the dish will be deployed. A conventional mounting approach may suit a particular layout, but the final choice depends on verified compatibility and installation conditions. For broader power context, see this guide to 12V Starlink conversion for caravans.
Once you’ve established the dish and mounting approach, Telco Antennas’ Starlink aftermarket power conversion is part of the next compatibility assessment. Consider the starlink flat high performance 12v conversion kit alongside the dish requirements and caravan supply, not on mount profile alone.
Check your caravan’s 12V system before choosing a Starlink conversion
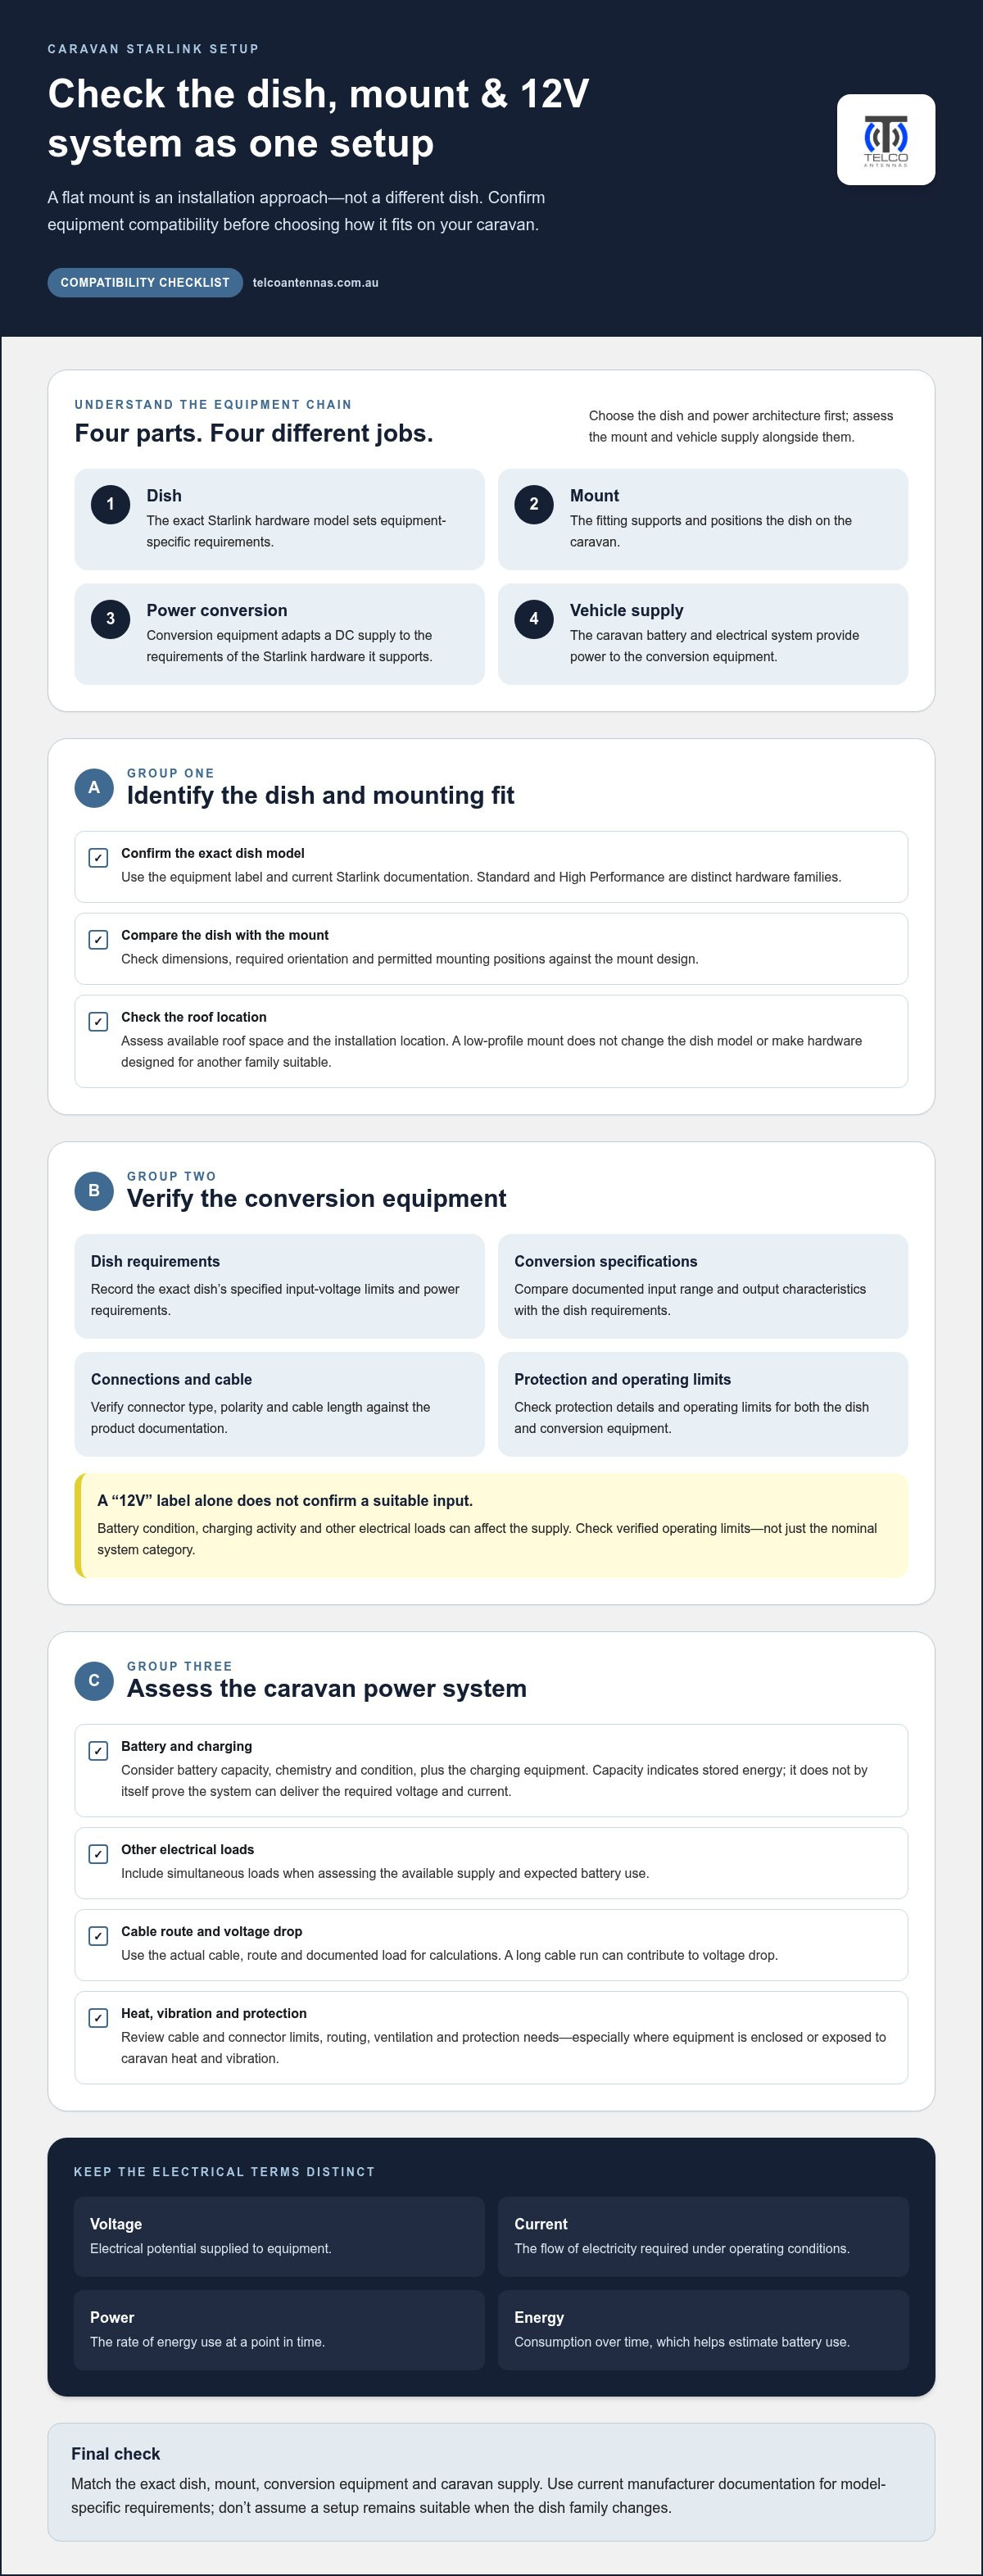
Choosing a conversion involves two checks: whether the equipment is compatible, and whether the caravan installation can supply and protect it appropriately. Start with the dish and its manufacturer requirements, then assess the vehicle system and installation conditions. This helps distinguish a product’s compatibility from the suitability of the complete vehicle installation.
What information should you gather before selecting a kit?
Record the details below before choosing conversion hardware. Requirements for one Starlink family shouldn’t be assumed to apply to another, so identify the exact dish first.
- Identify the dish. Note its exact model and gather current manufacturer documentation for power input and mounting requirements.
- Record the planned mount. Document its position, cable route and whether connections will remain accessible for inspection.
- Describe the battery system. Record the battery type and condition, charging equipment and other loads that may run at the same time.
- Estimate operating needs. Consider how long you expect to use Starlink between charging opportunities, alongside the caravan’s other power demands.
- Compare conversion specifications. Verify the kit’s supported input and output characteristics, dish compatibility and documented protection requirements against the manufacturer’s requirements.
Battery capacity alone doesn’t establish that the system can provide the required voltage and current throughout operation. Cable length and route matter too, as they can affect voltage at the equipment. Assess these factors together rather than treating the starlink flat high performance 12v conversion kit as a standalone component.
How should the installation plan account for real travel conditions?
Plan for the conditions the caravan will encounter. Vibration can affect how equipment and connections are supported; moisture exposure, ventilation and heat depend on the installation location. Consider how cables will be protected from damage and whether the dish, connections and conversion equipment can be reached for maintenance.
Electrical protection and installation must suit both the vehicle system and product requirements. A compatible conversion product doesn’t, by itself, establish that the full installation is suitable. Avoid generic wiring assumptions. Use the relevant product documentation and assess the vehicle installation against its requirements.
Before selecting conversion hardware, document:
- Exact dish model and manufacturer power requirements
- Mount location, cable route and access for servicing
- Battery condition, battery type and charging sources
- Other expected electrical loads and intended operating duration
- Verified conversion input, output and protection specifications
With these details in hand, explore Starlink power conversion solutions as the next step in matching conversion equipment to your dish and caravan system.
Choose a Starlink caravan configuration by matching dish, mount and power
There’s no single mount or power arrangement that suits every caravan. Start with the dish model, then match its mounting requirements and documented power needs to your roof layout, battery system and travel pattern. Use the options below as a decision guide, not confirmation of fitment. Each combination depends on current equipment specifications and conditions at the installation site.
- Frequent travel: If the dish will stay mounted while the caravan is regularly on the move, prioritise verified dish-and-mount compatibility, secure cable routing and access for routine inspection. A low-profile approach may suit limited roof clearance if manufacturer guidance and installation conditions support it.
- Fixed caravan installation: If the dish will generally remain in one position, compare the available mounting surface, roof obstructions and service access. A conventional mount may suit the layout if it supports the exact dish model and its permitted position.
- Occasional deployment: If you’ll set up the dish only at selected stops, consider how it will be positioned, connected and stored between uses. Easy access and a practical cable route may matter more than a permanently low-profile installation.
- Power source: For any use case, check the battery supply and charging setup against the conversion equipment’s documented input requirements and the dish’s manufacturer specifications. A mount doesn’t determine electrical compatibility.
These are conditional starting points. Weather exposure, vibration, obstruction and maintenance access vary between caravans, so assess the proposed position rather than assuming a configuration will work across all vehicles. For a broader look at accessory choices, see Best Starlink Accessories Australia: Professional Solutions for Remote Connectivity in 2026.
What should a complete selection decision include?
Bring the mechanical and electrical checks together before settling on a configuration. Confirm the exact dish model, mount fitment and manufacturer mounting guidance, then compare the dish’s power requirements with the conversion equipment’s documented input, output and protection specifications. Check the caravan battery supply, charging sources, other loads, cable route and access for ongoing inspection.
Consider Telco Antennas’ Starlink aftermarket power conversion as part of the complete system, rather than treating conversion as a cable substitution. Assess the starlink flat high performance 12v conversion kit against the specific dish and vehicle supply. Don’t assume requirements transfer between Starlink models.
In short, match the dish first, verify the mount, then assess the conversion and caravan supply as one installation. View Starlink power conversion solutions and use the compatibility checks above to guide your configuration choice.
Build your caravan setup around verified compatibility
The right configuration starts with the exact Starlink dish, not the mount’s profile. Confirm the dish’s manufacturer requirements, then match its mounting position and fitment to your caravan. For a starlink flat high performance 12v conversion kit, check the conversion equipment’s documented specifications against your battery supply, cable route and expected loads. A 12V label alone doesn’t establish compatibility.
Weather exposure, vibration, obstruction and maintenance access can all influence where and how the system is installed. Assess these practical conditions alongside the electrical requirements so the dish, mount and power arrangement work as a complete setup.
Telco Antennas is an Australian specialist in telecommunications and connectivity hardware. Founded in 2008, the business supplies Starlink aftermarket power conversion as part of its hardware range. Explore Starlink power conversion solutions as you plan a configuration around your dish and caravan system.
Make your selection by checking the dish, mount and vehicle supply together. Explore Telco Antennas’ Starlink power conversion solutions.
Frequently Asked Questions
Can Starlink High Performance run from a 12V caravan system?
Yes, it can be powered from a caravan DC system when the conversion equipment is specified for the exact dish and the vehicle supply meets the documented input requirements. A starlink flat high performance 12v conversion kit isn’t simply a cable replacement: check its supported dish model, input limits, output characteristics and protection details. Also account for battery condition, charging and other loads that may affect the available supply.
Is a flat mount compatible with a Starlink High Performance dish?
It can be, provided the mount is designed for the exact Starlink High Performance model and suits its permitted mounting positions. “Flat mount” describes a low-profile installation approach, not a dish type or a guarantee of compatibility. Compare the dish dimensions and manufacturer mounting guidance with the mount and available roof space. Check cable routing, nearby obstructions and whether the installed equipment will remain accessible for inspection.
What is the difference between a Starlink High Performance flat mount and a Standard caravan mount?
The comparison involves different dish families and mounting approaches, not two interchangeable mounts. A flat High Performance mount is intended to support a compatible High Performance dish in a low-profile position. A Standard caravan mount must suit the exact Standard model and its mounting requirements. Compare fitment, roof clearance, installation position and maintenance access. Assess power requirements separately, because the mount itself doesn’t establish 12V compatibility.
Will a Starlink 12V conversion kit work with every dish?
No. Conversion equipment is suitable only for the dish models and electrical requirements it supports. Starlink models can differ, so don’t assume a kit for one family will work with another. Check current manufacturer documentation for the dish’s power requirements, then compare these with the kit’s documented input range, output characteristics, connector and protection details. Establish compatibility for the complete equipment combination before installation.
How do I work out whether my caravan battery can power Starlink?
Compare the dish and conversion equipment’s documented electrical requirements with the battery system’s condition and ability to supply the required voltage and current. Then account for charging sources, other loads, cable length and expected operating time between charging opportunities. Battery capacity indicates stored energy, but doesn’t alone prove the system can deliver suitable power throughout operation. Base the assessment on the exact dish and conversion specifications, not a generic estimate.
Does a flat mount affect Starlink performance?
A flat mount doesn’t guarantee better or worse connectivity by itself. Performance can depend on the dish’s permitted orientation and operating guidance, as well as obstructions around its installed position. Roof fittings, accessories or nearby structures may affect the view available to the dish. Check the manufacturer’s mounting instructions and assess the caravan roof at the intended site. Also consider whether the position remains practical for inspection and maintenance.
Can I install a Starlink conversion kit myself in a caravan?
Possibly, if you can follow the conversion kit and dish instructions and safely complete the required mechanical and electrical work. First verify dish compatibility, input and output specifications, cable routing and protection needs. A suitable product doesn’t automatically make every vehicle installation safe. If the work is beyond your experience, avoid improvising wiring or protection; have the installation completed by someone competent to work on the caravan’s electrical system.


