
Plugging a 12V-tolerant satellite terminal straight into an unboosted auxiliary circuit seems like an effortless fix, yet relying on raw battery voltage is often the quickest route to brownouts and reboot loops. When weighing up a starlink standard vs starlink mini power conversion for 4wd battery setup, native voltage tolerance doesn't eliminate the requirement for clean, stable regulation. You shouldn't have to bleed 20 to 30 percent of your auxiliary lithium capacity just to power an inefficient pure sine wave inverter tare load inside a hot ute canopy.
This technical comparison breaks down the true electrical demands of both terminals so you can calculate exact daily amp-hour consumption and deploy the correct DC conversion hardware for your touring system. We'll examine operating voltages, line resistance thresholds, and step-up conversion strategies to ensure your satellite connection remains stable without draining your battery reserves.
Key Takeaways
- Explore the architectural distinctions when planning a starlink standard vs starlink mini power conversion for 4wd battery setup, contrasting high-voltage PoE injection with direct DC input.
- Eliminate tare current losses and 10 to 20 percent efficiency penalties by swapping pure sine wave inverters for dedicated DC-DC conversion hardware.
- Calculate real-world 24-hour amp-hour budgets to ensure auxiliary lithium banks sustain satellite communications alongside existing touring loads.
- Prevent destructive voltage sag and connection drops by replacing standard automotive cigarette sockets with heavy-gauge, vibration-proof Anderson connectors.
- Select conversion hardware engineered specifically to isolate sensitive satellite components from alternator voltage spikes and harsh off-road heat.
Understanding Starlink Power Architectures: Standard vs Mini DC Requirements
Operating low-earth-orbit communications off-grid requires a direct look at terminal power architecture. Casual online guides often claim both units plug straight into a 12V auxiliary line with minimal fuss. In the field, raw battery voltage fluctuates wildly under load, and treating these two terminals as electrically equivalent invites premature component failure. Deciding on a Starlink Standard vs Starlink Mini power conversion for 4WD battery setup demands matching internal receiver design with the characteristics of your dual-battery chemistry.
Every auxiliary system encounters electrical noise. Alternators, smart chargers, and inductive loads like compressor fridges push destructive voltage spikes into the electrical bus. Without clean isolation, these transients punch straight through sensitive beamforming arrays. Stable operation requires stepping nominal battery voltage through a purpose-built DC-to-DC converter rather than relying on unconditioned distribution blocks.
Starlink Standard (Gen 3) Voltage and PoE Demands
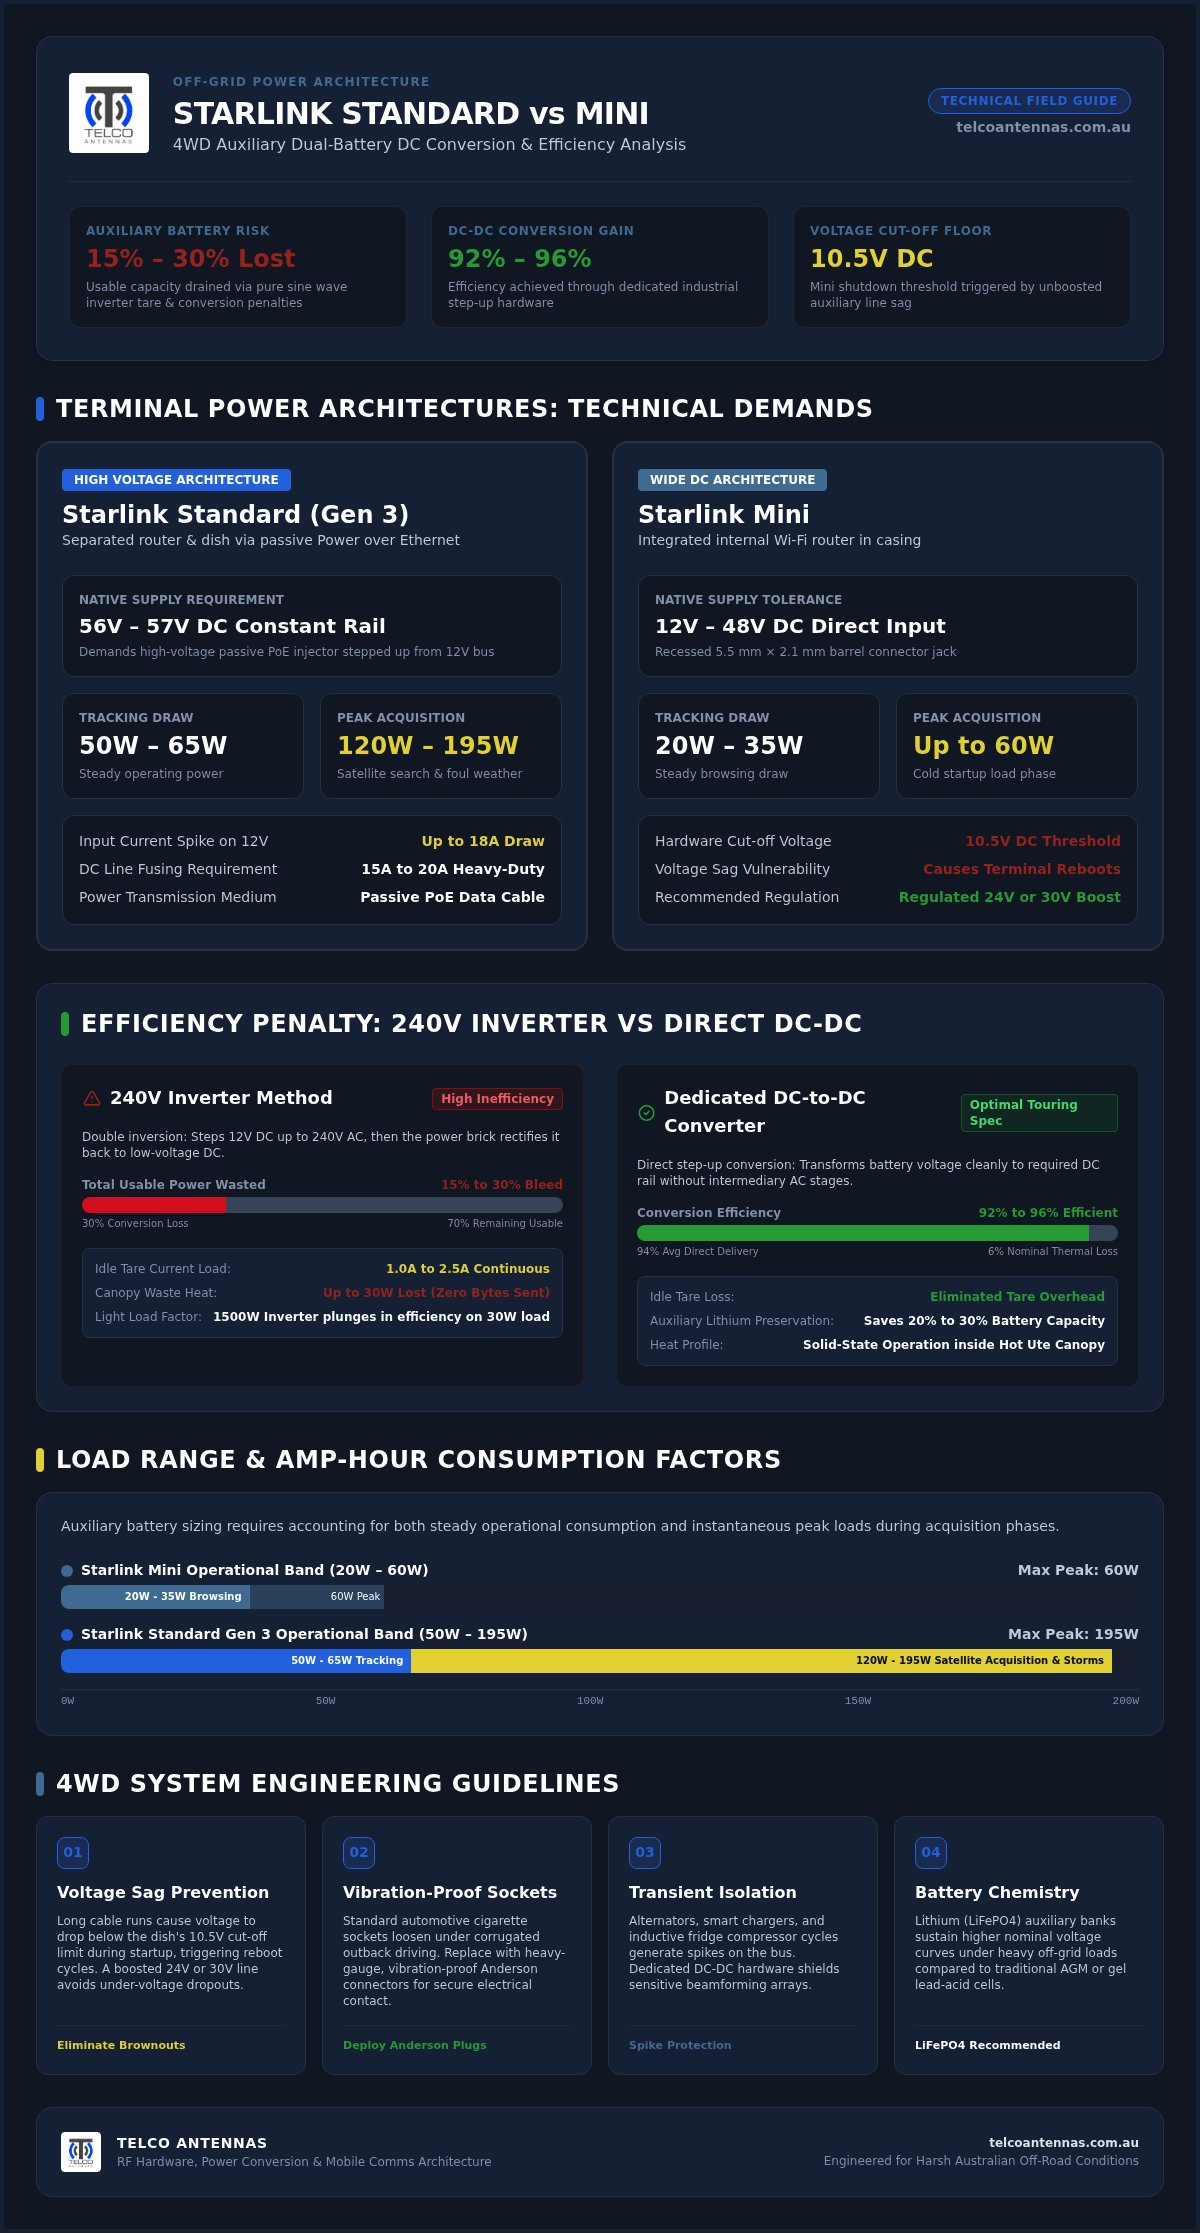
The Standard Gen 3 terminal relies on a separated Wi-Fi router and phased-array antenna connected via passive Power over Ethernet. Delivering power across this data line requires a constant 56V to 57V DC rail. During regular tracking, the terminal pulls between 50W and 65W. Startup satellite acquisition or inclement weather transmission rapidly spikes consumption between 120W and 195W, demanding robust 15A to 20A supply fusing on 12V inputs.
Starlink Mini Native DC Input and Voltage Tolerance
Unlike the Standard hardware, the Starlink Mini integrates its Wi-Fi router directly into the casing, using a recessed 5.5 mm x 2.1 mm barrel jack rated for a 12V to 48V DC input range. Steady-state web browsing draws a modest 20W to 35W, though cold starts can reach 60W. While a 12V tolerance sounds ideal for 4WD touring, unboosted wiring runs cause voltage to sag below the dish's 10.5V cut-off threshold under initial load spikes, triggering continuous terminal reboots.
- Standard Gen 3: Demands 56V-57V passive PoE step-up injection, pulling up to 18A on 12V lines during satellite search phases.
- Mini Architecture: Accepts 12V-48V direct input, but requires a regulated 24V or 30V boost to completely circumvent line-drop brownouts.
- Chemistry Compatibility: Lithium (LiFePO4) banks maintain higher nominal voltage curves than AGM or gel cells, reducing under-load sag across both platforms.
Choosing the correct Starlink Standard vs Starlink Mini power conversion for 4WD battery setup ultimately hinges on resolving this regulation gap before running cables through your canopy.
Inverter Draw vs DC-DC Conversion Efficiency on 4WD Auxiliary Systems
Running a satellite link from a 4WD auxiliary battery often starts with the path of least resistance: plugging the original mains power supply into an existing pure sine wave inverter. While functional, this method introduces double-inversion losses that severely punish off-grid battery capacity. Evaluating a Starlink Standard vs Starlink Mini power conversion for 4WD battery setup reveals that direct DC conversion delivers vastly superior efficiency compared to running high-voltage AC circuits purely to keep comms alive.
The Parasitic Penalty of 240V Inverter Installations
Converting 12V DC up to 240V AC, only for the factory power brick to rectify it back down to low-voltage DC, strips away 15 to 30 percent of your usable power. The problem worsens when you consult the typical inverter efficiency curve, which plunges when an inverter runs at low partial loads. A 1500W unit powering a 30W terminal operates far below its peak efficiency band. Worse still, the inverter consumes a continuous tare load of 1.0A to 2.5A merely idling, bleeding up to 30W into an enclosed canopy as heat before transferring a single byte.
Step-Up Conversion for Starlink Standard: 12V to 48V/56V
Because the Standard dish requires high voltage, moving away from AC demands stepping your 12V bus up to 56V or 57V DC. Quality industrial boost converters deliver 92 to 96 percent efficiency, stripping out the double-conversion penalty entirely. These converters feed high-power passive PoE injectors that route power straight down the data line, pairing seamlessly with dedicated Starlink aftermarket power conversion hardware. Solid-state step-up systems also integrate choke filters to isolate the dish's array from high-frequency alternator whine and electrical ripple.
Voltage Regulation for Starlink Mini on Fluctuating 12V Lines
Auxiliary battery voltages swing dramatically in the field, dropping from 14.6V during active solar charging to 10.5V under heavy camping loads. When an inductive load such as a dual-zone compressor fridge kicks on, the instantaneous voltage dip along shared chassis wiring drops raw circuit voltage below the Mini's operational cut-off. Deploying an automatic buck-boost or dedicated 12V-to-24V converter keeps line voltage rock-solid, completely eliminating transient reboots without wasting valuable amp-hours.
- Tare Load Elimination: Switching to direct DC conversion recovers between 12Ah and 30Ah of wasted idle energy every 24 hours.
- Thermal Management: Solid-state DC modules operate with minimal passive heat sink requirements, avoiding the noisy, high-temperature fans found in AC inverters.
- Clean Step-Up Rails: Synchronous rectification protects the terminal from raw alternator spikes while maintaining an uninterrupted link.
Standard vs Mini: Battery Bank Impact and Daily Amp-Hour Budgeting
Calculating the true daily load of satellite hardware separates successful off-grid touring setups from unexpected blackouts. Instantaneous wattage figures shown on app dashboards never reflect cumulative electrical drain across a full camp cycle. Evaluating a Starlink Standard vs Starlink Mini power conversion for 4WD battery setup requires auditing total amp-hour consumption against your auxiliary storage and typical solar harvest.
Calculating 24-Hour Energy Budgets on 12V Auxiliary Systems
To convert hardware power ratings into daily current draw, divide continuous wattage by the nominal 12.8V resting level of a lithium bank, then multiply by operating hours. The Standard Gen 3 dish averages 50W to 65W on direct DC, consuming roughly 3.9A to 5.1A continuously. Running it for 24 hours draws 100Ah to 135Ah. By comparison, independent testing highlighted in PCMag's Starlink Mini review confirms the smaller terminal averages just 20W to 35W, translating to 1.6A to 2.7A at 12.8V, or 37.5Ah to 60Ah over an entire day.
- 100Ah AGM Bank: Limited to 50Ah usable capacity; cannot run the Standard Gen 3 for more than 10 to 12 hours without causing permanent plate sulfation.
- 100Ah LiFePO4 Bank: Delivers 80Ah usable capacity; powers the Mini for up to 35 to 50 hours uninterrupted, but depletes in under 18 hours running the Standard dish.
- 200Ah LiFePO4 Bank: Provides 160Ah usable capacity; comfortably handles a 24-hour Standard dish run alongside a standard 12V upright fridge.
The Effect of Environmental Conditions on Power Consumption
Internal processing boards consume significantly more power in high ambient heat, which drives up base wattage as phased-array elements work harder to dissipate thermal energy. Selecting dedicated thermal mounting hardware, such as the solutions outlined in our guide to the best Starlink accessories Australia, prevents thermal throttling. Software settings introduce equal risk: leaving automatic "Snow Melt" activated can push transmission arrays to radiate maximum thermal energy, unexpectedly adding 100W to 120W of load and flattening dual-battery systems before morning.
Solar Replenishment and Alternator Charging Strategy
Replenishing a Starlink setup requires sizing auxiliary solar generation to outpace total system draw. Replacing the Mini's 50Ah daily draw demands roughly 150W to 200W of reliable solar input over a five-hour peak solar window. Conversely, the Standard terminal requires a minimum of 350W to 400W of roof-mounted solar glass simply to break even on stationary camps. If relying on in-vehicle DC-DC chargers, a 40A to 50A charger requires two to three hours of driving time to recover a depleted lithium bank after a full day running a Standard dish.
Carefully mapping these figures ensures your Starlink Standard vs Starlink Mini power conversion for 4WD battery setup delivers reliable connectivity without leaving your auxiliary fridge unpowered.
Designing a Robust 12V 4WD Electrical Setup for Starlink Hardware
Corrugated tracks and harsh outback environments ruthlessly expose electrical shortcuts. Standard 12V automotive cigarette lighter sockets present high internal contact resistance, loosen under continuous vibration, and generate severe thermal degradation during high-current passes. Building an enduring Starlink Standard vs Starlink Mini power conversion for 4WD battery setup demands hardwired, low-resistance connections engineered to survive demanding touring conditions.
Step 1: Managing Voltage Drop and Cable Sizing Calculations
Running wiring over four to six metres between an auxiliary battery and a rear canopy or roof rack induces notable conductor resistance. Operating the Starlink Standard on a 12V supply line requires sizing conductors for sustained 15A to 18A surge loads. Running undersized wiring drops nominal battery voltage well below 11.0V at the load terminal, causing premature system cut-offs. Installers should run a minimum of 10 AWG to 8 AWG (or 6mm auto) tinned copper cable for Standard step-up supplies, and at least 14 AWG to 16 AWG on dedicated Mini feeds.
Step 2: Circuit Protection, Fusing, and Connector Selection
Adequate overcurrent protection safeguards your vehicle against chassis shorts and thermal events. Mount a dedicated MIDI or MAXI fuse block directly beside the auxiliary battery distribution terminal rather than relying on distant inline holders. Replace friction-fit accessory plugs with genuine 50A Anderson connectors or locking DC couplers that remain seated over thousands of kilometres of corrugations. When passing exterior power lines through body panels, always install IP68-rated compression glands to stop dust and moisture ingress.
Step 3: Integrating Aftermarket Power Kits with Auxiliary Switch Panels
Terminating your power converter through a central auxiliary switch panel gives you isolated control over satellite standby current. Integrating a programmable low-voltage disconnect relay prevents the dish from slowly drawing your auxiliary battery past its critical depth-of-discharge threshold during prolonged stationary stops. Grounding your conversion hardware directly back to a common negative busbar eliminates ground loops and prevents parasitic RF interference from bleeding into your UHF radios or mobile boosters.
- Overcurrent Parameters: Fuse Starlink Mini circuits at 7.5A to 10A; protect Standard Gen 3 step-up conversion circuits with a 15A to 20A fuse.
- Mechanical Fastening: Route heavy-gauge cabling through protective split-conduit along structural chassis rails away from exhaust heat.
- Clean Terminations: Secure heavy cables using closed-end, crimped tinned-copper lugs to maintain electrical conductivity on corrugations.
To eliminate electrical bottlenecks with field-tested components, browse our engineered Starlink after market power conversion kits to complete your touring installation.
Selecting the Optimal Starlink Power Conversion Hardware for Your 4WD
Every remote touring build involves engineering trade-offs. Weighing a Starlink Standard vs Starlink Mini power conversion for 4WD battery setup comes down to balancing physical vehicle payload against available electrical capacity. As auxiliary batteries, canopies, and off-road hardware add substantial weight, you can discover Precision Offroad 4x4 for expert advice on keeping your rig's suspension and touring setup performing safely. Rather than viewing either terminal as a universal fix, successful installations match dish performance characteristics with real-world operating routines.
When to Deploy Starlink Mini for Remote Touring
The Starlink Mini suits mobile solo operators and minimalist setups built around compact 100Ah lithium banks. At 1.1 kg, the dish carries an internal Wi-Fi router, completely removing bulky power supplies and auxiliary networking enclosures from cramped vehicle canopies. Because it operates at roughly a third of the energy requirement of the larger hardware, it leaves plenty of headroom for basic camp accessories while providing reliable connectivity for daily work. For outdoor enthusiasts planning remote off-grid journeys, community hubs like Adventurerz provide valuable inspiration and insights into preparing for extended adventures.
Deploying the Starlink Standard Gen 3 makes sense when multi-device bandwidth demands outstrip the capabilities of compact hardware. Field crews, families, and remote commercial setups benefit from its larger phased array, which retains stronger signal link margins through heavy rain fade or partial tree cover. The trade-off is mechanical and electrical: accommodating 2.9 kg of antenna, a separate router or bypass injector, and a dedicated 200Ah or larger lithium reservoir to handle steady 56V step-up draw.
- Compact Payload Priority: The Mini delivers unmatched space efficiency and low thermal output, making it ideal for tight roof-rack mounts and lightweight setups.
- Maximum Throughput Priority: The Standard provides elevated transfer rates and broader local Wi-Fi coverage across multi-user camps.
- Hardware Footprint: Standard conversions require housing a dedicated boost box, cabling, and external routing hardware inside your canopy.
Deploying Engineered Power Solutions with Telco Antennas
Operating sensitive communications equipment across rugged Australian tracks requires components engineered specifically for remote environments. Off-the-shelf hobbyist boards lack adequate surge suppression, thermal heat sinking, and line filtering against harsh alternator noise. Consulting with our technical specialists ensures your conversion hardware pairs correctly with your auxiliary electrical infrastructure. Dedicated aftermarket power hardware isn't an optional accessory; clean DC power regulation is a core engineering requirement for reliable remote travel.
Determining your preferred Starlink Standard vs Starlink Mini power conversion for 4WD battery setup lets you build a durable system that keeps your communications operational without stranding you with a flat battery.
Engineering Reliable Remote Satellite Power for the Long Haul
Reliable off-grid communication comes down to clean voltage regulation and realistic energy budgeting. Bypassing inefficient pure sine wave inverters in favour of dedicated DC-DC conversion protects your auxiliary lithium bank from unnecessary tare losses and keeps your canopy cooler. Whether you capitalise on the lightweight, energy-efficient profile of the Mini or invest in the high-throughput capabilities of the Standard dish, choosing the right starlink standard vs starlink mini power conversion for 4wd battery setup ensures your connection remains steady over rough terrain.
Telco Antennas has spent over 15 years supplying specialised telecommunications and RF hardware across Australia. Backed by engineering-led technical support, our ruggedised equipment is built to endure extreme remote conditions. Explore professional Starlink power conversion kits and accessories at Telco Antennas to secure dependable satellite connectivity on your next expedition.
Frequently Asked Questions
Can I run a Starlink Mini directly from a 12V 4WD cigarette socket?
You can run it temporarily, but doing so isn't recommended for reliable touring. Cigarette sockets suffer from high internal contact resistance and vibrate loose over corrugated tracks. When the dish hits peak transmit loads during satellite acquisition, line resistance causes voltage to drop below the terminal's operating threshold. Hardwiring your connection with dedicated Anderson plugs or high-current DC couplers prevents sudden brownouts and keeps your hardware secure.
How many amp-hours does a Starlink Standard consume per hour on a 12V battery?
A Starlink Standard Gen 3 pulls roughly 4.0Ah to 5.5Ah per hour when powered through an efficient DC-DC step-up converter. Running that same terminal through a pure sine wave inverter increases hourly draw to between 6.0Ah and 8.0Ah due to conversion overheads and continuous inverter standby current. Active file transfers, cloud backups, and heavy rain fade will push consumption toward the higher end of that spectrum.
Why does my Starlink Mini reboot when my 12V 4WD fridge turns on?
Inductive inrush current from the compressor motor causes instantaneous voltage sag across shared vehicle wiring. When your fridge starts up, it creates a momentary dip that drags line voltage below the Mini's 10.5V cut-off limit. Because the dish lacks large internal filter capacitors, it reboots immediately. Installing a dedicated DC-DC buck-boost converter or a 12V-to-24V step-up unit isolates the terminal and keeps operating voltage completely stable.
Is an inverter or a 12V DC-DC converter better for Starlink in a 4WD?
A dedicated DC-DC converter is vastly superior for auxiliary battery setups. Inverters waste 15 to 30 percent of your usable power in heat and consume continuous standby current even while idling. When planning a starlink standard vs starlink mini power conversion for 4wd battery setup, direct DC conversion eliminates unnecessary tare losses, reduces internal canopy heat, and delivers clean, regulated power directly to your communications equipment.
What size battery do I need to run Starlink off-grid in Australia?
Battery capacity depends on your hardware choice and daily operating routine. A 100Ah lithium (LiFePO4) battery comfortably runs a Starlink Mini for up to two days alongside standard camp lighting and a small fridge. If you're running a Standard Gen 3 terminal continuously, you'll need at least a 200Ah lithium battery supported by 300W to 400W of solar panels to handle prolonged stationary stays.
Does running Starlink on DC power void the manufacturer hardware warranty?
Using third-party supplies doesn't inherently void your dish warranty, provided the voltage remains strictly within specified operating thresholds. The Starlink Mini natively accepts 12V to 48V DC via its standard barrel port, meaning no internal modifications are necessary. For the Standard dish, selecting purpose-built conversion hardware that connects directly to the factory RJ45 ports avoids cutting cables, protecting dish integrity while maintaining your auxiliary electrical safety.
How do I prevent voltage drop between my auxiliary battery and the Starlink dish?
Preventing voltage drop requires running appropriate cable cross-sections and eliminating high-resistance contact points. Install a minimum of 10 AWG tinned copper wire for Standard step-up converters and 14 AWG for Mini circuits over long canopy runs. Completing your starlink standard vs starlink mini power conversion for 4wd battery setup with secure Anderson plugs rather than friction-fit sockets ensures clean power delivery without thermal loss.


