

An off-the-shelf Starlink kit is rarely "outback ready" straight out of the box. While the hardware is revolutionary, relying on a standard 240V inverter to run your starlink mini caravan setup australia can waste approximately 20% of your battery capacity through unnecessary heat conversion. For the serious traveller, achieving a truly robust connection requires moving beyond temporary suction mounts and tangled extension leads to an engineered, hard-wired solution that survives the track.
You've likely felt the frustration of watching your battery monitor plummet or worrying if your hardware will shake loose on a corrugated road. It's a valid concern when your safety and work depend on a stable link in remote areas. This guide promises to solve those technical hurdles by providing expert advice on direct 12V integration and vibration-resistant mounting, focusing on the intersection of hardware specifications and the environmental variables found in the deep outback. We'll examine the specific components required for a seamless installation, from low-loss cabling to high-efficiency power kits, ensuring your internet remains a "set and forget" asset rather than a constant maintenance chore.
Key Takeaways
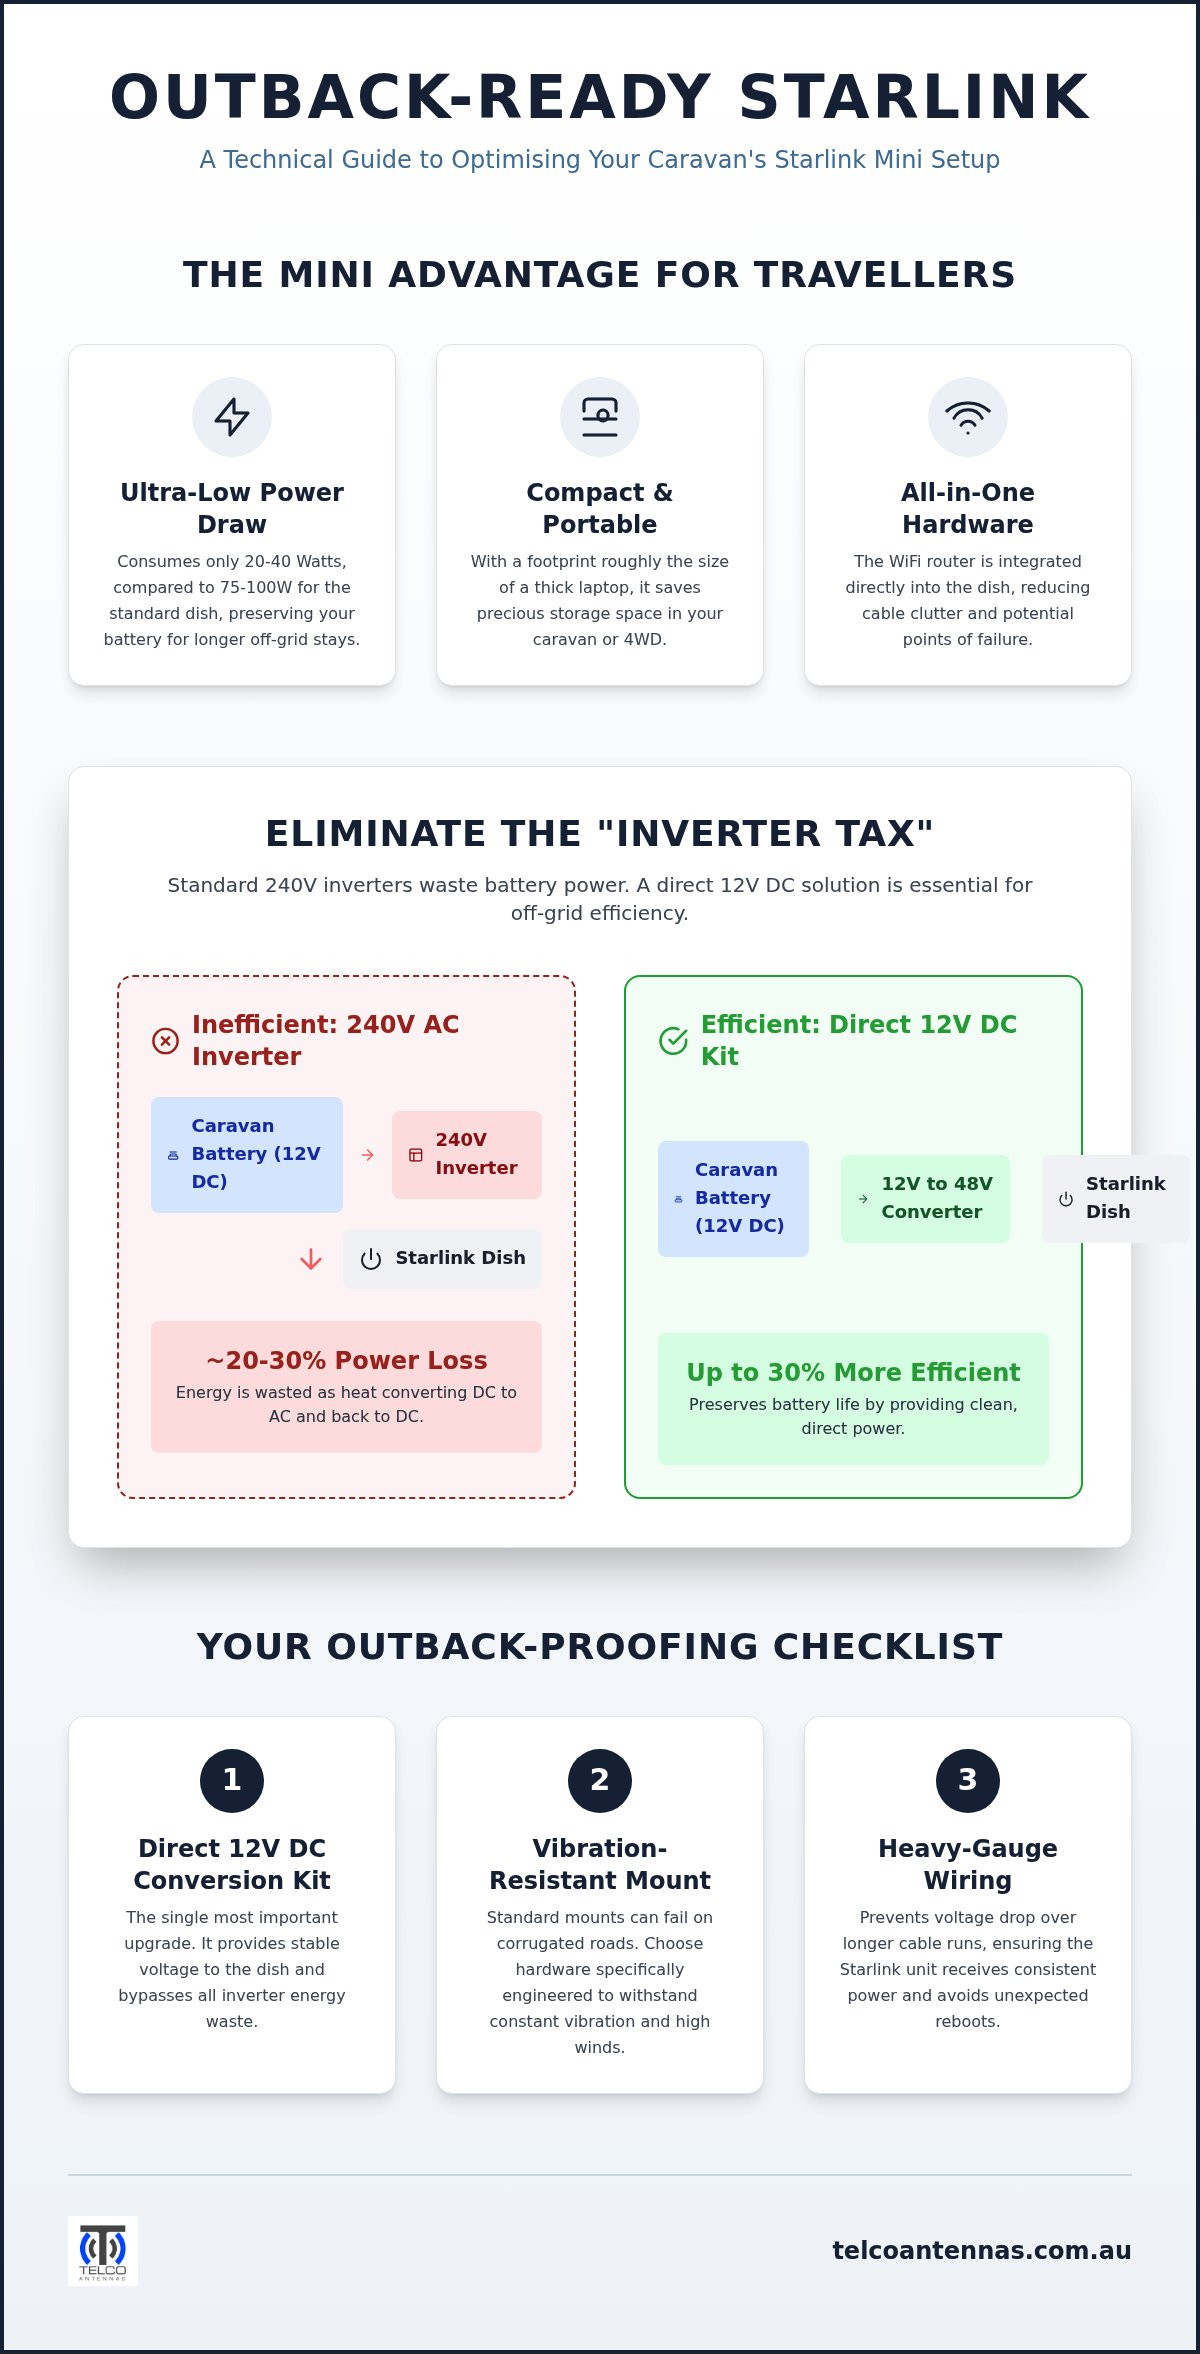
- Eliminate the "inverter tax" by using direct 12V power conversion kits, which can improve your system's energy efficiency by up to 30% compared to standard 240V setups.
- Optimise your starlink mini caravan setup australia by selecting mounting hardware specifically engineered to withstand the continuous vibration of corrugated outback tracks.
- Master the use of the Starlink App to identify and mask obstructions, ensuring a stable connection even when camping near heavy Australian flora like Ghost Gums.
- Understand why a hybrid connectivity approach integrating Cel-Fi GO signal boosters is necessary to maintain communications when your vehicle is in motion.
- Evaluate the mechanical trade-offs between quick-release and permanent mounting solutions to ensure your hardware remains secure in high-wind environments.
The Starlink Mini Advantage for Australian Travellers
The Starlink Mini represents a significant architectural shift in satellite hardware design, specifically for the mobile traveller. Unlike previous iterations that required a separate router and bulky external cabling, the Mini integrates the WiFi 5 router directly into the antenna housing. This all-in-one design reduces the physical footprint to roughly the size of a thick laptop, which is a major advantage for a starlink mini caravan setup australia where storage space is at a premium. By eliminating the separate router, you reduce both the cable clutter in your overhead lockers and the number of potential failure points in your network.
SpaceX's Starlink satellite internet network now consists of 10,116 operational satellites as of August 2026. This dense constellation allows the Mini to maintain high speeds while drawing only 20 to 40 Watts, which is significantly less than the 75 to 100 Watts often required by the Standard Gen 3 dish. For Australian caravanners, the 100GB Roam plan at $85 per month provides a cost-effective entry point for regional connectivity, following the price adjustments implemented in June 2026. The Mini is now the preferred choice because it balances high-speed performance with a power profile that doesn't deplete house batteries overnight.
Phased Array Technology in the Outback
The Mini utilises a sophisticated phased-array antenna system to track satellites electronically. Because there are no mechanical motors to fail, the unit is inherently more resilient to the dust, vibration, and grit of the outback. Its 110-degree field of view is wide enough to capture signals even when parked in light scrubland or near tall timber. Improved thermal management also ensures the hardware remains operational in ambient temperatures that would cause older portable units to thermal throttle, which is critical when travelling through the red centre during the summer months.
What is in the Australian Box?
The standard retail kit includes the dish with its integrated kickstand, a 15m AC power cable, and a basic pipe adapter. While this is sufficient for a caravan park with 240V hookups, it's inadequate for professional off-grid touring. A robust starlink mini caravan setup australia requires addressing the "missing links" that the factory box ignores. Most users will need to replace the standard AC adapter with a high-efficiency 12V DC conversion kit to bypass the energy losses associated with running a large inverter. High-quality cabling and vibration-proof mounting brackets are also essential additions to ensure the hardware survives thousands of kilometres on corrugated tracks.
Powering Your Setup: Direct 12V DC vs. 240V Inverters
Most owners start by plugging the factory AC brick into their caravan's inverter. This is inefficient. It wastes energy. This approach subjects your battery to what is known as the "Inverter Tax," where converting 12V DC to 240V AC, only for the Starlink power supply to convert it back to DC, loses approximately 20% to 30% of your power as heat. In a remote starlink mini caravan setup australia, where every Amp-hour is critical for off-grid longevity, this unnecessary drain can significantly reduce your stationary time before requiring a solar recharge.
A major technical hurdle often overlooked in a professional starlink mini caravan setup australia is voltage drop across long cable runs. If your battery bank is situated near the drawbar and your Starlink entry point is at the rear of the van, standard thin-gauge automotive wire will see a significant drop in potential. A 5-metre run of 18AWG wire can drop enough voltage to cause the Mini to reboot during high-demand satellite handovers. Using a thicker gauge or a dedicated conversion kit ensures the hardware receives a stable supply even as your battery voltage fluctuates under heavy loads from other appliances.
Direct 12V Conversion Kits
A high-quality 12V to 48V step-up converter is the most reliable method to stabilise performance. These kits take the variable 11V to 14.4V from your caravan’s battery management system (BMS) and provide a constant, clean output to the dish. On a direct 12V DC connection, the Starlink Mini typically draws an idle current of approximately 1.5 to 2 Amps. Integrating these systems via Anderson plugs provides a secure, high-current connection that remains vibration-resistant on the road. For those looking to optimise their electrical efficiency, Starlink aftermarket power conversion solutions provide the necessary hardware to bypass factory limitations.
Cabling Standards for High-Speed Data
Standard ethernet cables often lack the physical shielding required for a caravan environment. The aluminium or composite skin of a modern van can reflect RF signals, creating electromagnetic interference that degrades data speeds. Using shielded, outdoor-rated cables prevents this "noise" from affecting your connection. For permanent external cable entries, LMR-400 style shielding is highly effective at maintaining signal integrity over time. These specialised cables are designed to withstand intense UV exposure and physical abrasion, making them far superior to the thin, fragile leads supplied in the standard retail kit.
Mounting Solutions for Corrugated Roads and High Winds
Mounting a starlink mini caravan setup australia requires a mechanical solution that accounts for more than just static weight. While a magnet might hold on a sealed highway, it's inadequate for the high-frequency vibration of a corrugated outback track. This "washboard" effect can fatigue standard plastic clips or cause the dish to oscillate until it detaches. A professional installation utilises lockable, vibration-dampened brackets that secure the hardware's chassis directly to the vehicle's structural frame.
Choosing between a roof rack, bull bar, or rear ladder mount depends on your touring style. Roof mounting offers the best 360-degree sky view but exposes the dish to low-hanging scrub and increased wind load at highway speeds. Conversely, a rear ladder mount provides some physical protection from the vehicle's slipstream but may require a telescopic mast to clear the van's roofline. Many travellers opt for a "quick-release" hybrid system. This allows the dish to remain secure while driving but enables you to relocate it to a tripod if you're forced to camp under a heavy canopy.
Flat Mounting for In-Motion Use
Flat mounting the Mini is increasingly popular for in-motion use. While technically capable of operating in winds up to 96km/h, you must consider the aerodynamic lift generated under the dish. If it's mounted flush, ensure there's adequate airflow beneath the unit to prevent heat soak. Australian summer temperatures can push the hardware to its thermal limits if it's trapped against a dark-coloured roof without ventilation. Using an aerodynamic housing can reduce drag and provide a physical barrier against low-hanging branches on tight tracks.
Pole and Bull Bar Mounts
For those who prioritise flexibility, bull bar clamps and telescopic masts are the standard. These allow you to elevate the dish above the "shadow" of the caravan or nearby trees. When sourcing high-performance mounting hardware, you should consult the latest guide on Best Starlink Accessories Australia. These engineered solutions are designed to handle the specific mechanical stresses of Australian touring while providing the height needed to clear local scrubland obstructions.
Optimising Signal Performance in Remote Areas
Achieving a stable connection in the outback goes beyond simply pointing the dish at the sky. A high-performance starlink mini caravan setup australia requires a technical understanding of how local environmental factors, specifically Australian flora, interact with Ku-band radio frequencies. Unlike the sparse pine forests of North America, Australian Eucalypts like the Ghost Gum have dense, moisture-heavy leaves that act as highly effective RF shields. A single overhanging branch can cause intermittent packet loss, which is often enough to drop a secure work connection or a VoIP call.
Alignment in the Southern Hemisphere follows different rules. While the Mini is designed to sit relatively flat, the satellite density in Australia often favours a southern orientation rather than the northern bias found in the US or Europe. The Starlink App is your primary tool for diagnosing these situational variables. It's a sophisticated diagnostic suite that allows you to identify exactly which part of the sky is being clipped by obstructions, enabling you to reposition your vehicle before you've even unrolled the awning.
Dealing with Obstructions
Use the "360-degree scan" feature in the app as soon as you pull into a campsite. It's a predictive tool that uses your phone's camera to overlay the satellite "keep-out" zones on your physical surroundings. However, you must respect the "15-minute rule". The hardware requires at least 15 minutes of active uptime to build a comprehensive obstruction map based on actual satellite passes. If the app shows red sectors after this period, you're facing a physical blockage that software cannot fix. In these scenarios, you must decide whether the shade provided by the timber is worth the signal degradation.
Advanced WiFi Configuration
Congestion is a common issue in popular caravan parks where dozens of routers compete for the same 2.4GHz channels. You can mitigate this by splitting your WiFi bands in the Starlink settings. Keeping your laptops and streaming devices on the 5GHz band reduces interference from neighbouring setups. For those requiring a wider coverage area or a more permanent installation, you can utilise Point-to-Point Wireless Bridges to extend your high-speed link to an external building or shed. This ensures your connection remains private and stable, even in crowded remote camps.
Building a Complete Remote Connectivity Suite
Relying on a single communication technology is a significant risk when touring the Australian outback. While a starlink mini caravan setup australia provides impressive high-speed data in remote areas, it is not a total replacement for traditional mobile signal boosters. Satellite signals remain susceptible to atmospheric attenuation during heavy tropical storms and physical blocking in deep canyons or under dense forest canopies. A professional connectivity suite utilises a hybrid approach, ensuring you have a reliable fallback link when the sky view is compromised.
Organising your 12V hub to manage multiple communication devices is a critical step in this integration. By centralising your power distribution, you can monitor the total current draw of your Starlink, signal booster, and auxiliary router from a single point. This prevents "vampire" loads from depleting your battery bank and simplifies the troubleshooting process if a circuit trips on a rough track. A well-engineered hub ensures that your comms equipment remains protected from the voltage fluctuations common in dual-battery systems.
Starlink + Cellular: The Ultimate Combo
The most resilient setups integrate the Starlink Mini with a Cel-Fi GO mobile signal booster. This combination allows you to utilise WiFi Calling through the Starlink connection even when you have zero mobile bars. However, the Cel-Fi GO remains superior for "comms-on-the-move" applications. While Starlink continues to improve its in-motion capabilities, cellular boosters are purpose-built to maintain a stable voice link while traversing regional highways at 100km/h. Technical synergy is achieved when MIMO antennas provide a high-throughput cellular data link, acting as an automated failover if the satellite hardware loses its lock.
Future-Proofing Your Van
As satellite technology evolves towards Gen 4 and beyond, your van's physical infrastructure should remain adaptable. This requires using universal mounting standards and high-quality RF cabling like LMR-400 for all external ports. LMR-400 is the industry standard for a reason. Its low-loss properties ensure that every decibel of signal captured by your antenna actually reaches your hardware. Using inferior cabling in an outback environment often leads to signal degradation and physical failure due to UV exposure and moisture ingress.
A final checklist for a professional, outback-ready starlink mini caravan setup australia includes:
- Direct 12V power integration with dedicated fused circuits.
- Vibration-resistant mounting brackets for both the dish and external antennas.
- Weather-sealed cable entries using LMR-400 or shielded, outdoor-rated ethernet.
- A configured failover system between satellite and cellular data sources.
Securing Your Connectivity for the Long Haul
Transitioning from a basic plug-and-play kit to a high-efficiency, hard-wired system is essential for long-term outback travel. By implementing a direct 12V power conversion, you eliminate the energy losses associated with standard inverters, while robust, vibration-dampened mounting solutions ensure your hardware survives the rigours of corrugated tracks. A professional starlink mini caravan setup australia effectively balances these electrical requirements with mechanical durability to provide a "set and forget" internet solution that functions in the harshest environments.
Telco Antennas provides the specialist RF knowledge and engineered hardware required for these demanding conditions. Since 2008, we've supported travellers with technical solutions and Australian technical support specifically designed for outback conditions. Whether you're integrating a hybrid cellular system or optimising your power distribution, our expertise ensures your equipment remains operational when you're far from the nearest service centre.
Browse Professional Starlink Power and Mounting Solutions
With the right technical foundation, your remote connectivity remains a dependable asset, allowing you to explore the furthest reaches of the continent with complete confidence.
Frequently Asked Questions
Can I run the Starlink Mini directly off my caravan’s 12V battery?
Yes, you can run the Starlink Mini directly from your house batteries by using a 12V to 48V step-up converter. While the device accepts a range of DC inputs, a dedicated conversion kit stabilises the voltage and protects the internal electronics from the fluctuations common in caravan electrical systems. This method is the most efficient way to manage a starlink mini caravan setup australia, as it eliminates the energy waste associated with 240V inverters.
How much power does the Starlink Mini actually use in an Australian summer?
The average power draw remains between 20 and 40 Watts even during the peak of an Australian summer. While extreme heat can occasionally trigger internal thermal management protocols, the Mini is engineered to handle higher ambient temperatures more effectively than the Gen 2 hardware. Monitoring your battery state of charge is still recommended when stationary, as consistent 40W usage equates to roughly 3.3 Amps per hour on a standard 12V system.
Is it legal to use Starlink Mini while driving on Australian roads?
It is legal to use the Starlink Mini while in motion, provided the hardware is mounted according to Australian vehicle safety standards. The primary requirement is that the installation does not obstruct the driver's line of sight or create a hazardous external projection. Most travellers utilise the Roam plan's in-motion data feature for navigation and passenger connectivity. You must ensure the mounting system is rated for highway speeds and the constant vibration of regional roads.
What is the best way to mount a Starlink Mini to a caravan roof?
A professional installation typically involves an aerodynamic flat-mount housing or a reinforced bracket secured to the roof rack. These solutions prevent wind lift at highway speeds and provide a physical barrier against low-hanging branches. It is critical to use vibration-dampening materials between the mount and the caravan skin to protect the internal phased-array components from mechanical fatigue. Permanent mounts should also include a weather-sealed cable entry point using high-quality, UV-rated conduits.
Does the Starlink Mini work in heavy outback rain or dust storms?
The Starlink Mini is built with an IP67 environmental rating, meaning it is completely dust-tight and capable of withstanding heavy tropical downpours. While physical hardware damage is unlikely in a typical outback storm, "rain fade" can occur. This is a technical phenomenon where dense water droplets or dust clouds absorb the Ku-band radio signals, leading to temporary speed reductions or brief connection dropouts. The system generally recovers immediately once the weather front passes.
How do I stop my Starlink Mini from being stolen at a campsite?
Security is best managed through a combination of permanent mounting and physical deterrents. Many travellers use lockable mounting brackets that require a specific tool for removal, making opportunistic theft difficult. If you prefer a portable setup, securing the unit with a high-tensile stainless steel cable to your caravan's chassis or A-frame is an effective secondary measure. Always ensure your hardware is included in your comprehensive caravan insurance policy for remote travel.
Can I use my own router with the Starlink Mini?
You can use an external router by enabling "Bypass Mode" within the Starlink App settings. This disables the integrated WiFi 5 router and allows a more powerful third-party unit to manage your campsite network. This configuration is often preferred for larger caravans or when you need to extend the signal to an external annex. It requires a compatible ethernet adapter or a point-to-point wireless bridge to interface with your existing network hardware.
What happens to my Starlink Mini signal under heavy tree canopy?
A heavy tree canopy acts as a physical barrier that degrades or completely blocks the satellite signal. Because the Mini requires a clear 110-degree view of the sky to track moving satellites, even small branches can cause significant latency spikes and dropped packets. In these scenarios, the Starlink App's obstruction tool is vital for identifying a clear window. If a clear view is unavailable, your secondary mobile signal booster becomes the primary data link.


