

A standard plastic bracket is often the only thing standing between your Starlink investment and a high-velocity impact with the ground during a typical Australian summer storm. You likely already realise that the basic kickstand provided in the box isn't sufficient for overcoming local roofline obstructions or resisting the significant wind-loading forces common in our coastal and rural regions. Choosing a robust starlink pole mount adapter is not just about physical fit. It's about ensuring your hardware remains precisely aligned to maintain a stable satellite handover.
In this technical guide, you'll discover the specific structural requirements and material standards needed to achieve a professional, permanent installation in the Australian climate. We'll examine the critical compatibility differences between Gen 2 and Gen 3 hardware, the importance of using high-tensile, UV-stabilised components, and how to select the correct pipe diameter for your existing infrastructure. By the end, you'll have the technical knowledge to move beyond temporary fixes toward a secure, high-performance mounting solution that maximises your signal reliability.
Key Takeaways
- Identify the critical structural differences between Gen 2 and Gen 3 mounting systems to ensure your hardware interface is compatible with your specific dish version.
- Understand why die-cast aluminium alloy and UV-stabilised components are essential for resisting the extreme heat and coastal salt spray common across Australia.
- Determine the correct specifications for a starlink pole mount adapter to suit standard mast diameters, typically ranging from 30mm to 50mm.
- Learn why maintaining a perfectly vertical mast and using stainless steel fasteners is vital for the Gen 3 dish’s field of view and long-term signal stability.
- Discover the benefits of pairing professional mounting hardware with LMR-400 low-loss cabling to prevent signal degradation over extended installation runs.
Understanding the Starlink Pole Mount Adapter Requirements
A starlink pole mount adapter is the essential mechanical interface that secures your satellite hardware to a permanent mounting structure. While the dish arrives with a basic kickstand for ground use, this is rarely suitable for long-term Australian deployments where roofline obstructions or local terrain require elevated placement. By using a dedicated adapter, you can transition the dish from a temporary setup to a professional mast, ensuring the hardware remains stable despite the high wind loads often experienced in regional areas. This transition is particularly important for Starlink satellite internet users who need to bypass trees or adjacent structures to achieve a clear line of sight to the orbital constellation.
Gen 2 vs. Gen 3: Why Adapters are Not Interchangeable
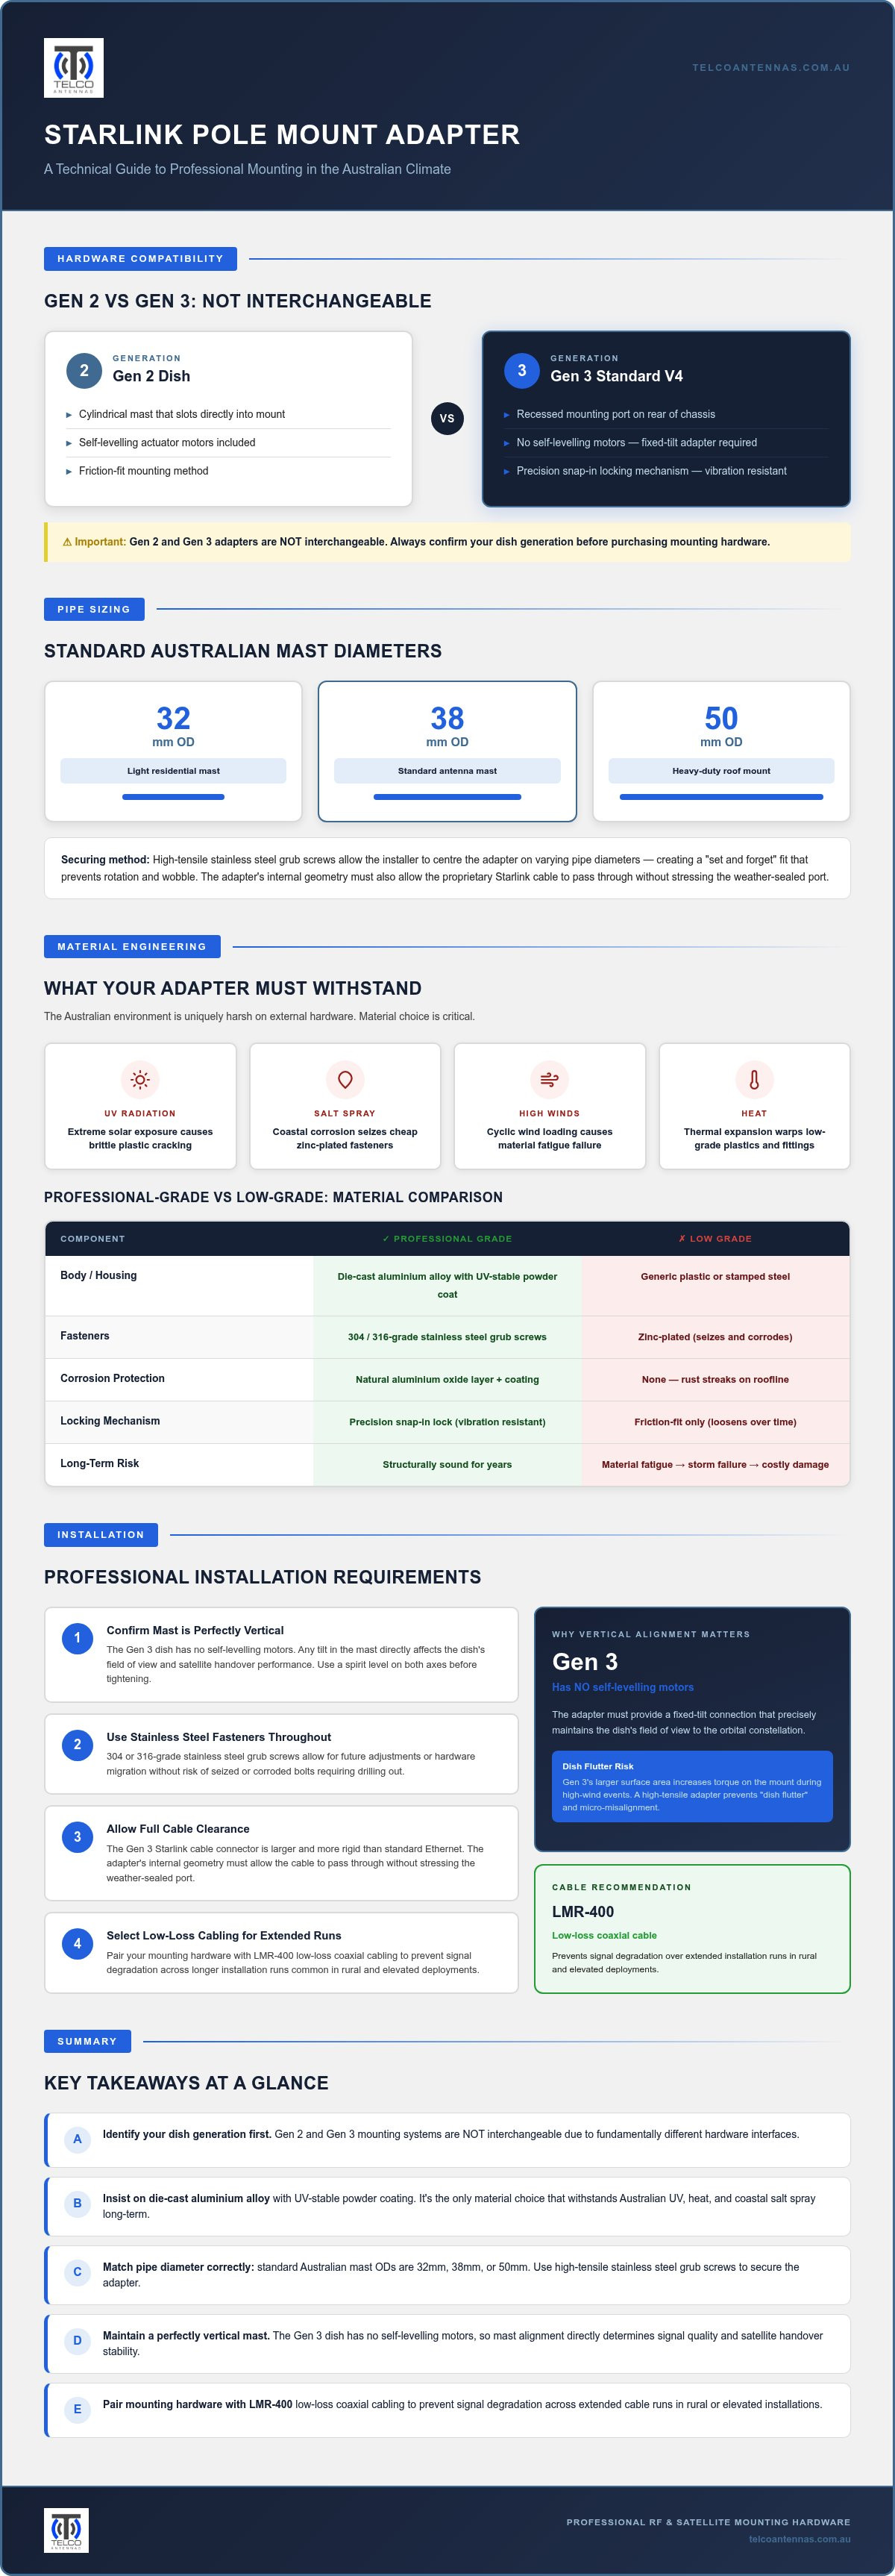
The evolution from the Gen 2 actuated dish to the Gen 3 Standard V4 has fundamentally changed the mounting requirements. Gen 2 systems featured a cylindrical mast that slotted directly into a mount; however, the Gen 3 dish utilises a recessed mounting port located on the rear of the chassis. Because the Gen 3 dish lacks the self-levelling motors found in earlier versions, the starlink pole mount adapter must provide a secure, fixed-tilt connection that maintains the dish's specific field of view. The Gen 3 hardware uses a precision snap-in locking mechanism. This ensures that once the adapter is seated, it cannot be dislodged by vibration or wind pressure, which is a significant upgrade over the friction-fit methods used in generic hardware.
Standard Pipe Diameters for Australian Installations
In Australia, most existing antenna masts and roof mounts follow standard sizing conventions, typically 32mm, 38mm, or 50mm Outer Diameter (OD). A professional-grade adapter is designed to be versatile, accommodating these varying diameters through the use of high-tensile stainless steel grub screws. These screws allow the installer to centre the adapter on the pipe, creating a snug, "set and forget" fit that prevents the dish from rotating or wobbling. It's also vital that the adapter provides sufficient internal clearance for the proprietary Starlink cable. The Gen 3 connector is larger and more rigid than standard Ethernet cables, so the adapter's internal geometry must allow the cable to pass through without putting undue stress on the weather-sealed port.
Material Engineering: Why Die-Cast Aluminium and UV Stability Matter
The Australian environment presents a unique set of challenges for external telecommunications hardware. High UV radiation levels, combined with extreme ambient temperatures and corrosive salt spray in coastal zones, will quickly compromise inferior materials. Selecting a starlink pole mount adapter manufactured from die-cast aluminium alloy provides a significant advantage over plastic or stamped steel alternatives. Aluminium naturally forms a protective oxide layer. When this is enhanced with a UV-stable powder coating, it ensures the adapter remains structurally sound for years. This material choice is also complemented by the use of 304 or 316-grade stainless steel for the locking screws. Unlike zinc-plated fasteners, stainless steel won't seize or corrode, allowing for future adjustments or hardware migrations without the need to drill out damaged bolts.
The Risks of Low-Grade Third-Party Adapters
Low-grade third-party adapters often utilise non-galvanised steel components that inevitably produce unsightly rust streaks across light-coloured rooflines. Beyond aesthetics, the primary risk is mechanical failure. Cheap plastics are prone to thermal expansion issues where the material becomes brittle and eventually cracks after repeated exposure to the Australian sun. Material fatigue is the progressive structural damage that occurs when a mounting component is subjected to cyclic loading from wind and thermal fluctuations. If the adapter fails during a storm, the resulting damage to the dish and the property often far exceeds the initial cost of professional-grade hardware. It's a common point of failure that can be avoided by prioritising engineering standards over retail convenience.
Weight and Wind Load Considerations
The Gen 3 dish presents a larger surface area than its predecessors, which increases the torque applied to the mounting point during high-wind events. A high-tensile starlink pole mount adapter is engineered to resist this force, preventing "dish flutter." This phenomenon involves micro-movements of the hardware that interfere with the precision of the satellite link. This flutter can lead to momentary signal drops as the dish struggles to maintain its phase-array alignment with passing satellites. It's essential that your mounting hardware is not the weakest link in the chain, especially in high-wind regions like the WA coast or the Victorian Highlands. For those seeking a robust installation, sourcing professional-grade RF hardware designed for local conditions is a pragmatic choice to ensure maximum uptime and structural longevity.
Comparing Mounting Options: Pole Adapters vs. Starlink Roof Mounts
Selecting the optimal location for your satellite hardware involves balancing structural stability with a clear line of sight (LoS). In many Australian residential and commercial properties, the roof peak provides the most reliable vantage point to avoid obstructions. However, achieving this position usually requires integrating a starlink roof mount with a specific hardware interface. A starlink pole mount adapter serves as the critical bridge in this configuration, allowing the dish to sit securely atop various mast types. Whether you're using a permanent J-pole or a temporary aluminium tripod, the adapter ensures the dish remains locked in place despite the torque generated by high-altitude winds.
One of the most pragmatic advantages of using an adapter is the ability to repurpose existing infrastructure. Many Australian homes already have redundant TV antenna masts or legacy satellite poles. If these mounts are structurally sound and correctly positioned, using a starlink pole mount adapter can save significant time and material costs. It eliminates the need for new roof penetrations, which reduces the risk of leaks and maintains the structural integrity of your building's envelope.
The Versatility of the Universal Pipe Adapter
Standard 2-inch (50mm) masts are common across rural Australia, particularly where high-gain terrestrial antennas were once required. A professional-grade adapter is designed to fit these legacy pipes precisely, providing a secure fit that generic brackets can't match. This versatility is equally important for industrial applications, such as mounting hardware to telescopic mast trailers for rapid deployment in mining or emergency service sectors. These adapters often feature a fixed 20-degree tilt. This engineering choice isn't just for signal alignment; it's designed to encourage rain runoff and prevent the accumulation of dust or debris on the dish surface, which helps maintain signal clarity during the dry season.
Fascia Mounts and Eave Brackets
Fascia mounts are a popular choice when a roof-peak installation isn't feasible or desired. These systems require a solid connection to the timber or steel fascia of the building. The pole adapter plays a vital role in this setup by providing the necessary vertical clearance to ensure the dish sits well above the guttering line. Without this height, the gutter itself or the roof's edge can create a signal "shadow," leading to intermittent dropouts and reduced speeds. A professional installation ensures the dish has an unobstructed field of view. This is essential for the Gen 3 dish, which relies on a wider viewing angle than earlier actuated models to maintain a stable link with the passing satellite constellation.
Professional Installation: Ensuring Vertical Orientation and Signal Clarity
The mechanical integrity of your installation depends on the precise execution of the mounting process. Once you have selected a suitable location, the first step involves seating the starlink pole mount adapter onto the mast. You should ensure the pipe end is clean and free of burrs that might prevent the adapter from sitting flush. The high-tensile stainless steel grub screws should be tightened in a staggered pattern to ensure even pressure around the circumference of the pole. This creates a balanced, high-friction bond that resists the rotational torque generated during high-wind events. Because the Australian sun causes significant thermal expansion and contraction, it's a pragmatic habit to re-check the tension of these fasteners several weeks after the initial installation.
For the Gen 3 Standard dish, achieving a perfectly vertical mast is a critical technical requirement. Unlike the Gen 2 actuated dish, which could use internal motors to compensate for a non-plumb mast, the Gen 3 relies on a fixed orientation. If the mast is even slightly off-vertical, the dish’s pre-defined field of view (FOV) is skewed. This misalignment can lead to intermittent signal drops as the dish loses track of satellites at the periphery of its horizon. You should use a spirit level on two axes to confirm the mast is plumb before the adapter is permanently locked into position.
Cable Routing and Protection
Protecting the proprietary Starlink cable is essential for long-term reliability. You should route the cable through the internal cavity of the mounting pole before snapping the dish into the starlink pole mount adapter to shield the connector from direct UV exposure and physical damage. When securing the cable to the exterior of the building, you must avoid using tight zip ties that can pinch the internal conductors and increase signal attenuation. Instead, use UV-rated cable clips or loose-fitting ties that allow for minor movement. For installations where the dish is positioned far from the router, integrating with LMR-400 coaxial cables through an aftermarket power conversion kit allows you to maintain high data throughput over extended distances without the voltage drop associated with standard Ethernet cabling.
Avoiding RF Interference and Obstructions
Height gain is often the most effective way to overcome terrain obstructions in the Australian bush, such as dense eucalyptus canopies or undulating ridgelines. By elevating the dish on a professional mast, you ensure a clear path for the signal to reach the orbital plane. The Fresnel zone is the elliptical volume of space surrounding the direct line of sight that must remain clear of physical obstructions to prevent signal diffraction and data loss. To avoid mutual interference, you should maintain a minimum clearance of 1.5 metres from other RF equipment, including mobile boosters or terrestrial TV antennas. For expert guidance on selecting the right hardware for your specific site, explore the professional range at Telco Antennas to ensure your deployment meets industrial engineering standards.
After the mount is secured and the cable is routed, use the Starlink app’s obstruction tool to perform a final site audit. This tool provides a 360-degree map of the dish’s FOV, identifying any remaining obstacles that might cause micro-outages. Only once the app confirms a "clear" status should you consider the installation complete.
Telco Antennas: High-Performance Hardware for Rugged Connectivity
Professional installers across Australia prioritise hardware that withstands the rigours of local conditions. Sourcing your equipment from an engineering-led company like Telco Antennas ensures that every component, from a basic bracket to a complex power conversion kit, meets stringent performance benchmarks. Unlike generic retail resellers, we approach satellite deployments as a critical piece of RF infrastructure. This technical perspective is vital for remote mining sites, agricultural hubs, and off-grid residential properties where signal reliability is non-negotiable. By choosing a high-tensile starlink pole mount adapter from a specialist provider, you're investing in a solution that's been field-tested in the same environments where it's expected to perform.
Engineering Support for Australian Customers
A successful Starlink deployment often requires more than just a clear sky. It demands a holistic communications plan that accounts for local topography and existing network interference. Our team provides access to specialised services such as RF site surveys and professional communication tower design to ensure your hardware is positioned for maximum uptime. If you're managing a complex multi-link installation for a commercial precinct or a large rural estate, having access to consultative expertise is invaluable. We don't just sell hardware; we provide the technical advice necessary to integrate Starlink with other technologies, such as high-gain MIMO antennas or point-to-point wireless bridges, creating a robust and redundant connectivity mesh.
Sourcing Reliable Mounting Accessories
The durability of your installation is only as strong as its weakest connection. We maintain a commitment to stocking only field-tested hardware that resists the material fatigue common in high-wind zones. Our starlink pole mount adapter range is manufactured to exacting tolerances, ensuring a seamless fit with the Gen 3 Standard dish's locking mechanism. When you combine these mounts with our Australian-designed 12V power conversion kits and LMR-400 low-loss cabling, you eliminate the common failure points associated with consumer-grade setups. Engineering matters. This "system-wide" approach to quality is why we've remained specialists in remote telecommunications since 2008. If you're ready to secure your hardware for the long term, you can view our full range of Starlink mounting solutions and accessories online.
Securing Your Connectivity for the Long Term
Achieving a professional-grade Starlink installation requires a shift from temporary consumer hardware to engineered infrastructure that can withstand the Australian environment. By selecting a high-tensile starlink pole mount adapter manufactured from UV-stabilised die-cast aluminium, you eliminate the risks of material fatigue and structural failure during extreme weather. It's clear that the precision of your mounting system directly impacts the consistency of your satellite link, particularly with the fixed viewing angle of Gen 3 hardware. Using components designed for local conditions ensures your equipment remains plumb and secure despite the cyclic loading of high winds.
Telco Antennas has been trusted by Australian RF engineers since 2008 to provide specialised hardware for the harshest remote environments. Our team offers expert technical support based right here in Australia to help you navigate complex installation requirements. Whether you're upgrading a residential site or deploying industrial-scale connectivity, using field-tested components ensures your network remains stable for years to come. Optimise your Starlink setup with professional Australian mounting hardware from Telco Antennas and enjoy the peace of mind that comes with a secure, high-performance solution.
Frequently Asked Questions
Does the Starlink pole mount adapter fit the Gen 3 dish?
Yes, but you must ensure you're using the specific version designed for the Gen 3 Standard V4 hardware. Unlike the cylindrical mast of the Gen 2 dish, the Gen 3 version utilises a recessed port that requires a precision snap-in locking mechanism. Older adapters engineered for the actuated Gen 2 dish are mechanically incompatible with this newer design, so it's vital to verify the hardware version before you begin your installation.
Can I use the same adapter for Starlink Mini and the Standard kit?
No, the Starlink Mini and the Standard V4 kit have different mounting port dimensions and structural requirements. The Mini is intended for ultra-portable applications and features a smaller interface, whereas the Standard dish has a larger surface area that demands a more robust structural connection. You should always select a mounting solution that's specifically rated for your dish model to prevent mechanical failure or accidental dislodgement during high winds.
What size pole do I need for a Starlink pipe adapter in Australia?
Most professional adapters are designed to accommodate standard Australian mast diameters ranging from 30mm to 50mm Outer Diameter (OD). This range covers the common 32mm, 38mm, and 50mm pipes used for legacy TV antennas and satellite mounts across the country. Using a starlink pole mount adapter with adjustable stainless steel grub screws allows you to achieve a centred, high-friction bond on any of these standard regional pipe sizes.
Is the Starlink pole mount adapter waterproof and rust-resistant?
Professional-grade adapters are highly resistant to corrosion but aren't "waterproof" in the sense of being a sealed enclosure. High-quality versions use die-cast aluminium alloy and 304 or 316-grade stainless steel fasteners to prevent rust in coastal salt-spray environments. These materials ensure that the starlink pole mount adapter remains structurally sound and won't seize over time, which is a common failure point for cheaper, zinc-plated steel alternatives found in generic retail stores.
Can I install the Starlink pole mount adapter myself?
Yes, you can install the adapter yourself if you have basic mechanical skills and the necessary safety equipment for working at heights. The process involves securing the adapter to a plumb mast and routing the proprietary cable through the internal cavity to protect it from UV damage. However, if you're uncomfortable with roof access or require a complex structural mast, consulting a specialist with experience in Australian RF infrastructure is a pragmatic way to ensure the job is done correctly.
Do I need to ground my Starlink mount for lightning protection?
Grounding your mount is strongly recommended to protect your hardware from static buildup and nearby lightning strikes. In regional Australia, where electrical storms are frequent, connecting the metal mast to a dedicated earth stake helps dissipate energy before it reaches your sensitive indoor networking equipment. While the Starlink cable itself has some shielding, providing a primary ground path for the external mounting structure is a standard safety requirement for professional telecommunications deployments.
How much wind can a Starlink pole mount adapter withstand?
A correctly installed professional adapter is engineered to withstand high-velocity wind gusts common in coastal and rural regions. While specific ratings vary, high-tensile aluminium adapters are designed to resist the significant torque generated by the Gen 3 dish's large surface area. The limiting factor is often the mast or the roof attachment point rather than the adapter itself, so you must ensure the entire mounting chain is structurally sound for your local conditions.
What happens if my Starlink dish is not perfectly vertical?
If your Gen 3 dish is not perfectly vertical, its fixed field of view will be misaligned with the orbital plane of the satellite constellation. This misalignment often leads to increased latency and frequent micro-outages as the dish struggles to hand over signal between passing satellites at the edge of its horizon. Using a spirit level during the installation of your mast ensures the hardware remains plumb, which is vital for maintaining maximum signal uptime and speed.


