

If you're relying on the basic ground mount included in your box to survive a standard Australian storm, is your connection truly secure or just waiting for the next heavy gust? Most homeowners quickly realise that while the satellite technology is world-class, the out-of-the-box mounting solutions aren't always engineered for the extreme wind speeds or intense UV exposure found across the country. You've likely felt the anxiety of watching a high-speed gust rattle your hardware, or perhaps you're confused about why your new Gen 3 dish won't fit the starlink roof mount kit you researched months ago.
We understand that a reliable connection depends on more than just a clear view of the sky; it requires a structural foundation that respects Australian engineering requirements. This guide provides the technical roadmap for a secure, high-performance installation tailored for our specific environmental variables. We will break down the compatibility hurdles between Gen 2 and Gen 3 hardware, explain the mechanical necessity of C4 wind-rated mounts, and show you how to ensure your roof remains watertight and obstruction-free for years to come.
Key Takeaways
- Understand why a structural roof mount is essential for maintaining a clear line of sight and protecting your hardware from Australian environmental extremes.
- Identify the critical design differences between Gen 2 and Gen 3 hardware to ensure you select the correct adapter for a seamless mechanical fit.
- Learn how to cross-reference your location with AS1170.2 wind region classifications to choose a starlink roof mount kit that meets local safety standards.
- Master professional installation techniques, including using the Starlink app for precise site surveys and securing mounts directly to internal structural rafters.
- Discover the performance benefits of using industrial-strength aluminium tripods and aftermarket 12V power conversions for remote or off-grid connectivity.
What is a Starlink Roof Mount Kit and Why is it Essential?
A starlink roof mount kit is a specialised structural assembly engineered to secure your dish to the highest feasible point of a building. While the hardware arrives with a basic ground mount, these are rarely sufficient for a permanent Australian installation. The primary objective is to elevate the dish above local obstructions such as roof gables, gutters, or nearby vegetation to ensure an uninterrupted link with the Starlink satellite constellation.
Stability is a critical factor often overlooked by retail-grade solutions. High-frequency satellite links are sensitive to even minor physical movements. If a mount flexes during a wind event, it can cause micro-outages as the phased-array antenna struggles to maintain its beam-forming lock. A professional-grade kit typically includes a pivot or ridge mount, specialised weatherproofing sealants, and adapters designed to interface with the specific dish mast.
The Problem with Obstructions and Signal Drops
Placement is everything. Before you select a starlink roof mount kit, you must use the obstruction tool within the official app to identify the zero obstruction coordinate on your roof. Even a single tree branch or a chimney stack can lead to signal attenuation or increased thermal noise, which degrades your throughput. Raising the dish via a roof mount maximises the antenna's field of view, allowing it to track satellites across the horizon without interference from the surrounding environment.
Official vs. Aftermarket Mounting Solutions
Standard proprietary hardware often lacks the versatility required for diverse Australian architecture. Whether you're dealing with corrugated iron or traditional concrete tiles, your mounting feet must match the structural profile to prevent leaks. Aftermarket kits offer superior flexibility, often utilising a pipe adapter to bridge the gap between heavy-duty masts and the Starlink dish. These solutions allow for greater height and better corrosion resistance in coastal environments compared to basic retail options. Choosing an aftermarket solution also ensures you aren't locked into a single mounting style if your hardware needs change in the future.
Compatibility Guide: Gen 2 vs. Gen 3 (V4) Roof Mounts
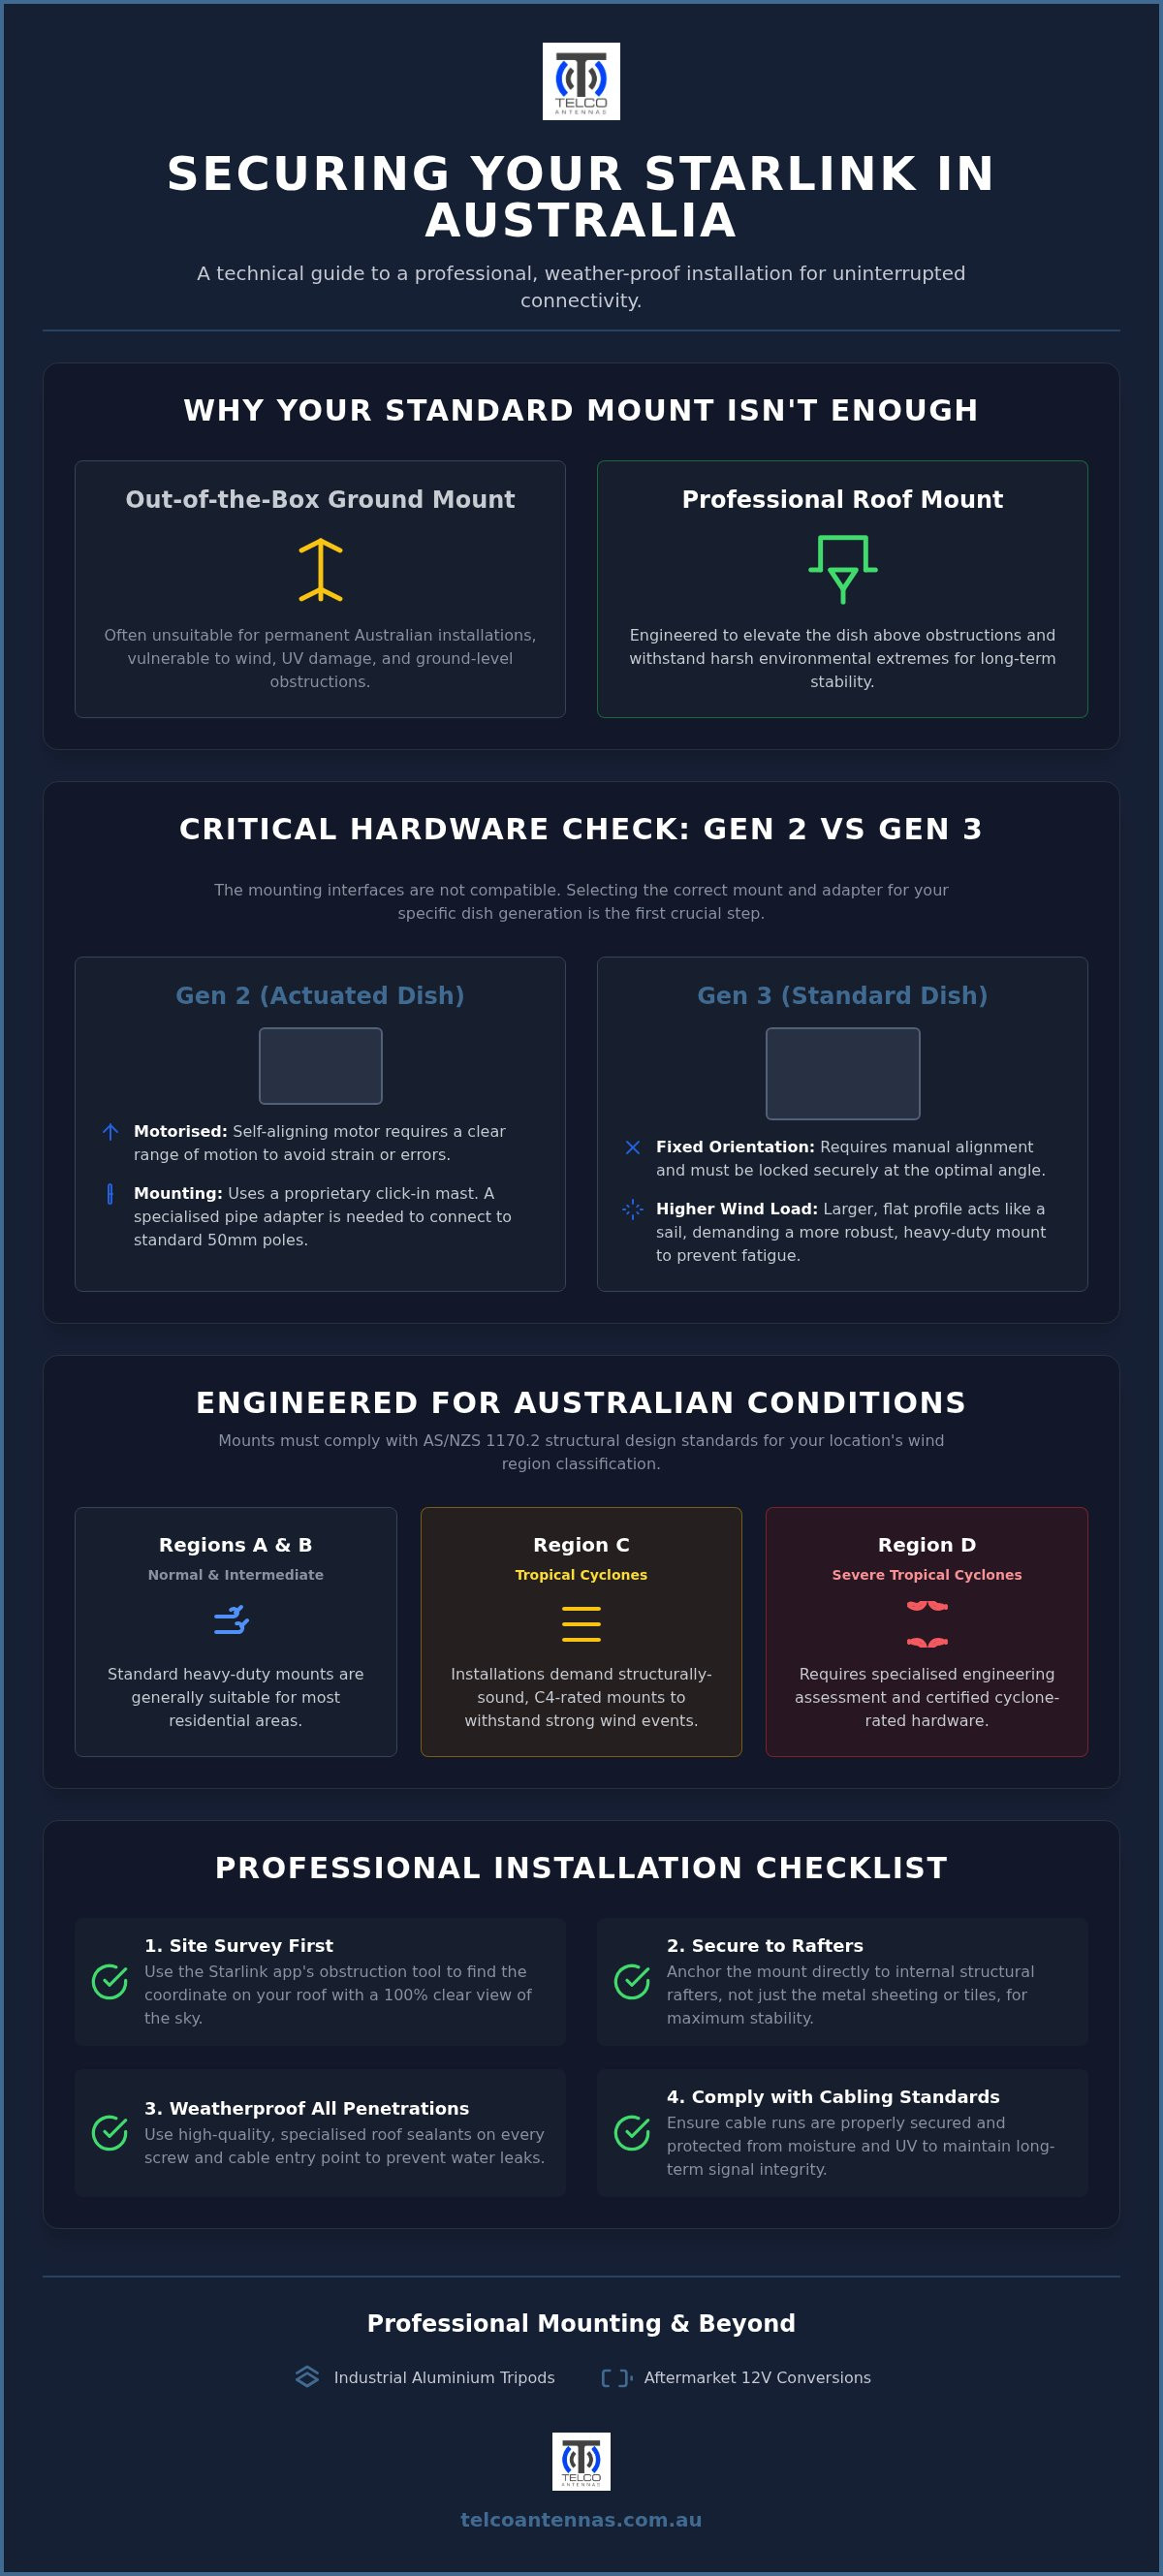
Distinguishing between the two primary hardware generations is the first technical hurdle for any installer. The Gen 2 (Actuated) model is the rectangular dish featuring an integrated motor, while the Gen 3 (Standard/V4) is the larger, flat model that ships with a removable kickstand. Selecting a starlink roof mount kit requires a precise understanding of these mechanical differences because the mounting interfaces are fundamentally incompatible. Gen 2 hardware relies on a proprietary click-in mast, whereas the Gen 3 design typically necessitates a pipe adapter to interface with standard Australian mounting poles.
Structural weight and surface area are significant factors in 2026. Gen 3 dishes present a larger physical profile to the elements, which substantially increases the wind load exerted on the mounting hardware. While a mount for an older Gen 2 might have sufficed with a lighter frame, a Gen 3 installation demands a more robust, ridged assembly to prevent structural fatigue over time. This is particularly relevant in Region C and D wind zones where gusts can easily compromise under-engineered hardware.
Mounting the Starlink Gen 2 (Rectangular Dish)
The Gen 2 dish is designed to move. Your chosen starlink roof mount kit must provide a clear range of motion for the internal actuated motor. Any physical obstruction that prevents the dish from tilting will lead to motor strain or "motors stuck" alerts. Most professional setups for this model utilise a specialised pipe adapter to secure the proprietary mast to a 50mm diameter mast. Beyond the physical mount, ensuring your cable entry points and runs comply with Australian cabling standards is vital for long-term signal integrity and moisture protection.
Mounting the Starlink Gen 3 / V4 (Standard Dish)
The Gen 3 dish is a fixed-orientation device that requires manual alignment during the initial setup. For a permanent roof installation, you'll need to bypass the default kickstand in favour of a dedicated pole mount adapter. Because it doesn't self-correct its tilt, the mount must be locked at an angle that optimises coverage for the Australian southern sky. The flat profile acts like a sail in heavy weather. We recommend using heavy-duty aluminium tripods to provide a broader footprint and superior vibration dampening. This ensures the dish remains static even during the intense weather events common in rural environments.
Engineering for the Australian Climate: Wind Ratings and Materials
Engineering a starlink roof mount kit for the Australian continent requires strict adherence to AS1170.2, the structural design standard for wind actions. Unlike milder climates, Australia is partitioned into distinct wind regions ranging from Region A (normal) to Region D (severe cyclonic). A mounting solution that functions in an inland environment will likely fail in coastal or northern latitudes where wind gusts can exceed 250 km/h. Professionals must cross-reference their installation site with these classifications to ensure the mount's base plate and mast thickness can withstand the specific lateral forces of their zone.
Material selection is the next technical priority. To prevent premature structural failure, hardware should be constructed from either hot-dipped galvanised steel or marine-grade aluminium. These materials provide the necessary resistance to the salt-laden air common in coastal regions. We must also consider galvanic corrosion; this occurs when dissimilar metals, such as stainless steel fasteners and a zincalume roof, interact in the presence of moisture. This electrochemical reaction leads to rapid pitting and structural degradation of the roof sheeting. Additionally, the mount must account for thermal expansion. In the Australian outback, surface temperatures on a tin roof can fluctuate by 50°C within a single diurnal cycle, necessitating a mounting footprint that can expand and contract without compromising the seal.
Wind Loading and Structural Integrity
The "effective area" of a Starlink dish acts as a sail, translating wind speed into significant physical pressure on the mast. For high-mast installations in coastal areas, stay wires are often mandatory to prevent oscillation. While a standard pivot mount is suitable for low-profile residential setups, heavy-duty aluminium tripods are the superior alternative for high-wind zones. These tripods distribute the load across multiple structural points, providing a more stable platform that reduces the vibration-induced signal jitter discussed in previous sections.
UV Resistance and Sealant Selection
Intense UV radiation is a primary cause of failure for retail-grade plastic mounting components, which become brittle and crack within a few seasons. A professional starlink roof mount kit utilises metal assemblies and UV-stabilised polymer components. For water-tightness, the choice of sealant is non-negotiable. Only neutral-cure silicone should be used on metal roof penetrations. Acid-cure silicones release acetic acid during the curing process, which causes immediate corrosion of the protective coating on steel roofs. When paired with a correctly sized dektite or roof flashing, this ensures a multi-decade seal that survives the harshest Australian conditions.
Step-by-Step: Professional Installation Best Practices
A successful deployment begins with a precise site survey. Before any drilling occurs, you must use the Starlink app to locate the exact 'zero obstruction' coordinate on your roof. This process involves scanning the horizon to ensure the dish has a clear field of view, free from chimney stacks or overhanging eaves. Once the location is confirmed, the mechanical focus shifts to structural attachment. A starlink roof mount kit should never be secured solely to the roof sheeting; instead, you must fix the base plate directly into a structural rafter or purlin. This ensures the assembly can handle the torque and leverage forces generated during high-wind events without warping the metal skin of your building.
Electrical safety is equally paramount. In storm-prone Australian regions, RF equipment acts as a potential lightning path. Proper grounding of the mount to the building’s earth system is a technical requirement that protects your internal hardware from static build-up and indirect strikes. For assistance with professional earthing and wiring, you can learn more about Redlec Energy Solutions. If you're unsure about the structural or electrical requirements for your specific site, booking a professional RF Site Survey provides the necessary engineering oversight for a compliant installation.
Mastering the Cable Run
Cable hygiene is the most common point of failure in DIY setups. The proprietary Starlink cable is a high-bandwidth shielded line that is susceptible to internal fractures if mishandled. You must respect the minimum bend radius; never tight-coil excess cable or pull it through sharp apertures. In Australia, protecting this line from local wildlife is essential. Cockatoos are notorious for destroying exposed cabling, so we recommend using UV-stabilised split-conduit for all external runs. For building entry, avoid simple holes in favour of a 'gooseneck' or a professional wall plate to maintain a clean, weather-tight finish.
Testing and Alignment Post-Mounting
After the starlink roof mount kit is physically secured, the final phase involves electronic verification. Before tightening the mast bolts, use the 'stow' command in the app to ensure the dish can move freely through its range without hitting the mount or roof. Monitor the 'Debug Data' in the Starlink app for the Signal-to-Noise Ratio (SNR); a stable connection should show consistent levels without erratic drops. Finally, always incorporate a 'drip loop' where the cable enters the building. This simple U-shaped bend ensures that rainwater running down the cable falls off at the bottom of the loop rather than being wicked into the building interior.
The Telco Antennas Advantage: Professional Mounting & Beyond
Professional RF installers prioritise hardware that minimises maintenance cycles. While a standard starlink roof mount kit might satisfy basic residential needs, industrial and remote sites require a higher tier of mechanical stability. Aluminium tripods are the preferred choice for these environments because they offer a rigid, lightweight platform that resists the vibration-induced signal jitter mentioned in earlier sections. These tripods are engineered to withstand the high torque loads of the larger Gen 3 dishes, providing a structural foundation that retail-grade pivot mounts simply cannot match.
Beyond the physical mount, a robust connectivity suite often requires Starlink aftermarket power conversion. For off-grid sites or mobile command centres, converting the system to run on native 12V or 24V DC power eliminates the efficiency losses of an inverter. This is often paired with high-performance cabling and connectors to maintain maximum data throughput. In remote Australia, we frequently design systems that combine satellite backhaul with Cel-Fi GO Signal Boosters. This allows users to leverage Starlink for data while ensuring reliable voice coverage for mobile devices within the building or vehicle.
Custom Mounting Solutions for Unique Roofs
There are scenarios where a standard starlink roof mount kit is insufficient due to extreme obstructions or temporary site requirements. For rapid deployment at industrial locations, telescopic mast trailers provide the height necessary to clear heavy machinery or dense vegetation. Aluminium tripods remain a staple for unique roof profiles, offering a non-penetrating or multi-point attachment option that preserves building integrity. Our engineering team also facilitates complex deployments involving long-range wireless bridges to distribute the Starlink connection across multiple structures or vast rural properties.
Future-Proofing Your Remote Connectivity
As satellite hardware evolves toward Gen 4 and beyond, investing in modular mounting infrastructure is a pragmatic decision. A high-quality mast or tripod allows for easier hardware swaps without needing to re-drill or re-seal roof penetrations. For mission-critical reliability, we recommend integrating MIMO antennas to provide 4G or 5G failover. This ensures that if the satellite link is temporarily obscured by intense storm cells, your network remains operational. To find the right components for your specific environment, explore our curated range of Starlink accessories or contact our technical team for a professional site design.
Securing Your Structural Connection for the Long Term
Selecting the correct starlink roof mount kit is a technical decision that determines the long-term reliability of your satellite connection. As we've examined, a professional installation requires more than just height; it demands a deep understanding of AS1170.2 wind region classifications and the specific mechanical interfaces of your hardware generation. By prioritising structural attachment to rafters and utilising UV-stabilised components, you ensure your equipment remains static and secure despite the environmental extremes common across the continent.
Telco Antennas has been Australian-owned and operated since 2008, specialising in technical engineering support for remote and industrial connectivity. Our high-performance hardware is specifically designed to withstand Australian conditions, offering a level of durability that standard retail mounts cannot provide. We invite you to Browse Professional Starlink Mounting Hardware at Telco Antennas to find the ideal structural foundation for your system. With the right engineering approach, your satellite link will deliver consistent throughput for years to come.
Frequently Asked Questions
Can I use a standard TV antenna mount for my Starlink dish?
While a standard TV antenna mount might appear compatible, it's rarely engineered to handle the physical torque and wind loading of a satellite dish. Starlink hardware, particularly the Gen 3 model, presents a much larger surface area than a lightweight TV aerial. Using a standard mount often leads to mast flex or structural failure during high-wind events. We recommend a dedicated starlink roof mount kit that utilises a 50mm diameter mast and heavy-duty base plates for long-term stability.
What is the best roof mount for a corrugated iron roof in Australia?
For corrugated iron roofs, the most reliable solution is a mount that secures directly into the internal rafters or purlins rather than just the roof sheeting. Aluminium tri-pods are highly effective here as they distribute the weight across multiple structural points. It's essential to use neutral-cure silicone and a correctly sized dektite to ensure the penetration remains watertight. This approach prevents the metal fatigue and leaks often associated with surface-only mounting systems.
Do I need a special adapter for the Starlink Gen 3 (V4) dish?
Yes, the Starlink Gen 3 (V4) dish requires a specific adapter because it lacks the integrated mast found on the Gen 2 model. The Gen 3 dish is designed with a removable kickstand intended for ground use. For a permanent roof installation, you must use a pipe adapter or a specialised ridged mount that interfaces with the dish's unique base. This ensures a secure mechanical lock that can withstand the increased wind pressure of the larger flat-panel design.
How do I protect the Starlink cable from being eaten by birds?
Bird damage, specifically from cockatoos, is a significant environmental risk for Starlink installations in Australia. These birds can easily chew through the proprietary cable's outer jacket, causing internal fractures and signal loss. To prevent this, you should house all exposed external cabling in UV-stabilised split conduit or flexible PVC piping. This physical barrier protects the cable from both pest interference and the intense UV radiation that can cause the cable jacket to become brittle.
Is it safe to mount Starlink on a chimney?
Mounting Starlink on a chimney is generally not advised due to the mechanical vibration and wind load the dish generates. Most residential chimneys are not designed to handle the lateral force exerted on a tall mast, which can lead to cracked mortar or structural degradation over time. It's safer to use a starlink roof mount kit fixed to the building's timber rafters. This provides a more rigid foundation and avoids potential damage to your home's masonry.
Will mounting Starlink on my roof void my home insurance?
While mounting the dish itself doesn't typically void insurance, a poor installation that leads to water damage or structural failure might result in a rejected claim. Most Australian insurers require that building modifications are performed to a tradesman-like standard. Using a mount that isn't rated for your specific wind region or failing to use proper flashing can lead to issues. Ensuring your setup meets AS1170.2 standards is the best way to maintain your policy's integrity.
How much wind can a professional Starlink roof mount withstand?
The wind resistance of a mount depends on its engineering rating and the wind region of your property. For example, professional mounts designed for Region C or D can withstand gusts exceeding 250 km/h. High-performance C4 rated hardware is often engineered to remain stable in winds up to 310 km/h. It's vital to choose a mount that matches the AS1170.2 classification for your specific location to ensure the assembly doesn't buckle during a severe weather event.
Do I need to ground my Starlink roof mount?
Grounding your mount is a critical technical requirement for protecting your hardware from static build-up and indirect lightning strikes. RF equipment on a roof acts as a potential path for electrical discharge. By connecting the mount to the building's earthing system, you provide a safe route for electricity to dissipate. This reduces the risk of a surge travelling down the proprietary cable and destroying your Starlink router or other sensitive internal network equipment.


